

Advanced End-to-End DevSecOps Kubernetes Three-Tier Project using Azure AKS, fluxCD, Prometheus, Grafana, and GitLab


Table of contents

Introduction
In today’s rapidly evolving technological landscape, the deployment and management of cloud infrastructure are paramount for businesses striving for efficiency and scalability. DevOps practices coupled with cloud-native technologies offer a seamless approach to achieving this goal. In this blog, we delve into the intricacies of deploying a cloud infrastructure stack on Azure using Terraform and managing secrets securely with HashiCorp Vault. By leveraging GitLab CI/CD pipelines, we automate the deployment process, ensuring reliability and consistency in our infrastructure deployments.
Objective
The objective of this blog is to demonstrate the implementation of a robust DevOps workflow for provisioning and managing cloud infrastructure on Azure. By employing Terraform for infrastructure as code (IaC) and HashiCorp Vault for secure secret management, we aim to streamline the deployment process while maintaining high levels of security and efficiency. Through a step-by-step guide, we provide insights into setting up GitLab CI/CD pipelines to automate the deployment and configuration tasks, empowering organizations to embrace modern DevOps practices effectively.
Pre-requisites
A foundational understanding of cloud computing concepts, particularly Azure services, Terraform, and GitLab CI/CD pipelines.
Familiarity with Kubernetes and containerization principles.
Access to an Azure subscription with appropriate permissions to create resources and manage secrets.
Basic understanding of networking concepts and security principles.

Before going for the Workflow
Kindly, go through the above Hierarchical diagram which will give an overview of the Project Directory
Repository: https://github.com/AmanPathak-DevOps/End-to-End-Azure-DevSecOps-Project
Workflow:
Step 1: We will create a GitLab VM on Azure Cloud with other networking services using Terraform.
Step 2: Once the Terraform script is ready, We will deploy the infrastructure using the GitLab CI Pipeline.
Step 3: We will create a HashiCorp Vault VM to store secrets on that server using Terraform, along with other networking services.
Step 4: We will deploy the infrastructure using the GitLab CI Pipeline.
Step 5: We will configure the HashiCorp Vault Server by creating roles, policies, and secrets (client ID and secret ID of Azure Account for Azure AKS).
Step 6: We are ready to create the Azure AKS Terraform Script.
Step 7: We will deploy the infrastructure using the GitLab CI Pipeline.
Step 8: We will work on the Source Code, starting with the backend.
Step 9: We will create a Dockerfile for the backend code.
Step 10: We will create a GitLab Runner for the backend repository and register it to run the pipeline on a self-hosted GitLab VM instead of GitLab-owned shared runners.
Step 11: We will generate the credentials of Azure ACR for the backend registry (a Dockerhub alternative).
Step 12: We will add the required variables in our backend repository.
Step 13: We will create the GitLab Pipeline.
Step 14: We will push our backend code, and the pipeline will start automatically.
Step 15: Now, we will work on the frontend Source Code.
Step 16: We will create a Dockerfile for the frontend code.
Step 17: We will create a GitLab Runner for the frontend repository and register it to run the pipeline on a self-hosted GitLab VM instead of GitLab-owned shared runners.
Step 18: We will generate the credentials of Azure ACR for the frontend registry (a Dockerhub alternative).
Step 19: We will add the required variables in our frontend repository.
Step 20: We will create the GitLab Pipeline.
Step 21: We will push our frontend code, and the pipeline will start automatically.
Step 22: Our next step will be to deploy the application on AKS, for which there are some prerequisites.
Step 23: We will install the Nginx ingress controller to deploy our application on AKS.
Step 24: We will configure the cert-manager to add an SSL certificate to our application.
Step 25: We will implement monitoring for our Kubernetes cluster using Prometheus & Grafana.
Step 26: Now, we will deploy our application on the Kubernetes Cluster. For that, we need to create manifest files.
Step 27: We will create manifest files for the Database, such as stateful sets, services, PV, PVC, and secrets.
Step 28: We will create manifest files for the backend, such as deployment and service.
Step 29: We will create a manifest file for the front end, such as deployment and service.
Step 30: Now, we will create our ingress file to deploy our application outside of the cluster with SSL.
Step 31: Once the manifest is created, we will automate CD, meaning whenever there is any change in the manifest such as an image update or anything, we don’t need to run the manifest file ourselves. For that, we will use fluxCD.
Step 32: We will install fluxCD on the Kubernetes Cluster.
Step 33: We will bootstrap the fluxCD, which will create its repository inside the Kubernetes-Manifest Subgroup named flux-config.
Step 34: We will create manifest-source and manifest-kustomization for each type of manifest, whether it’s database, backend, frontend, or ingress. This will enable automated CD.
HandsOn
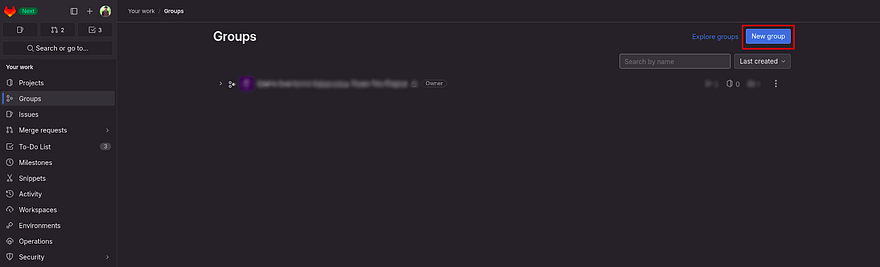
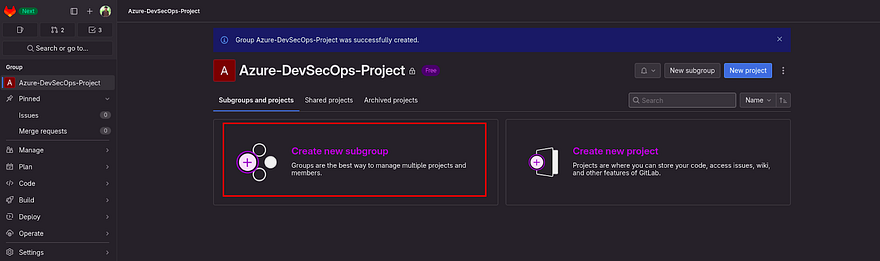
Click on Groups

Click on New Group
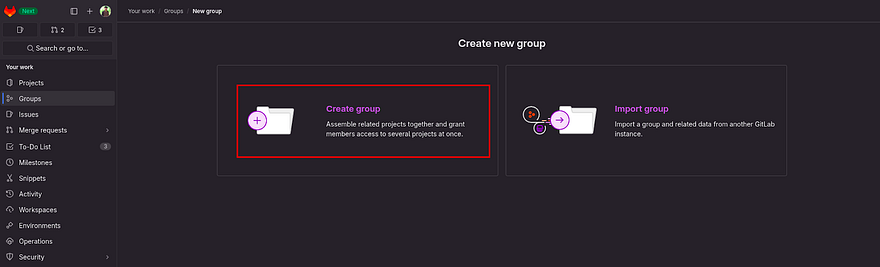
Click on Create group
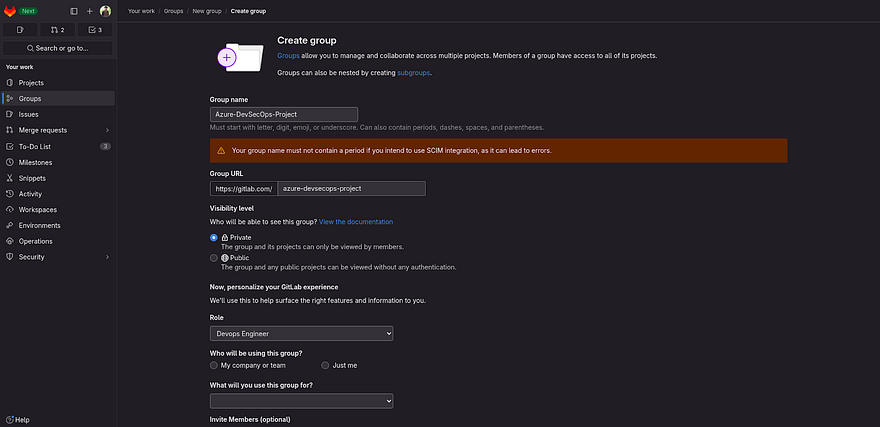
Provide the name of your Group
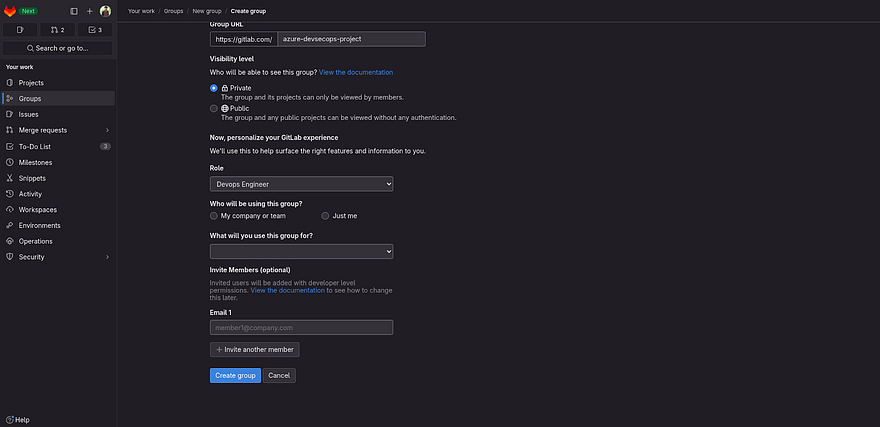
Click on Create Group
A group has been created
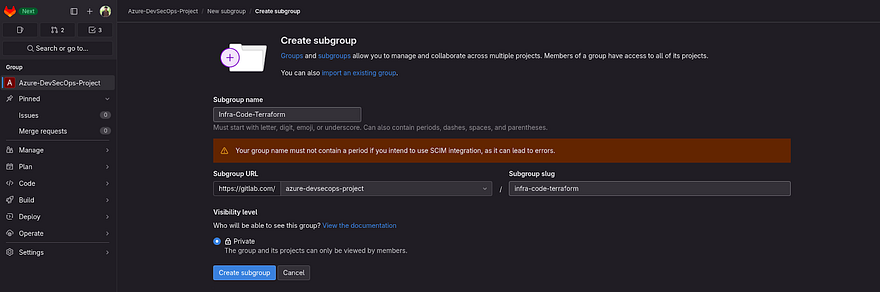
Now, we need to create a subgroup for each(Terraform, Source Code & Kubernetes Manifests)
Click on Create new subgroup
Provide the name of your subgroup and click on Create Subgroup
As you can see our first subgroup has been created.
Now, we need to create two more subgroup within the Azure-DevSecOps-Project
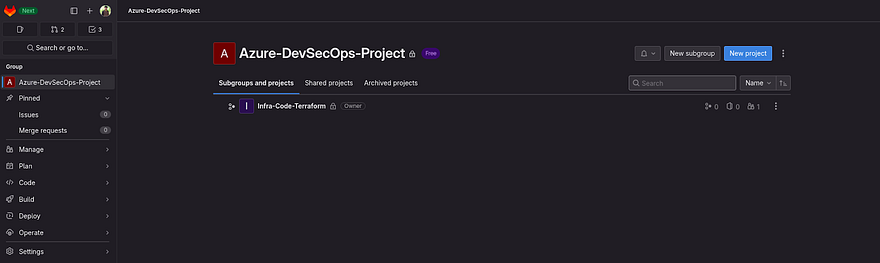
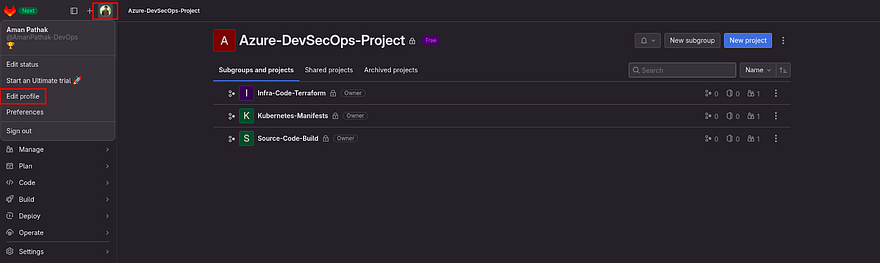
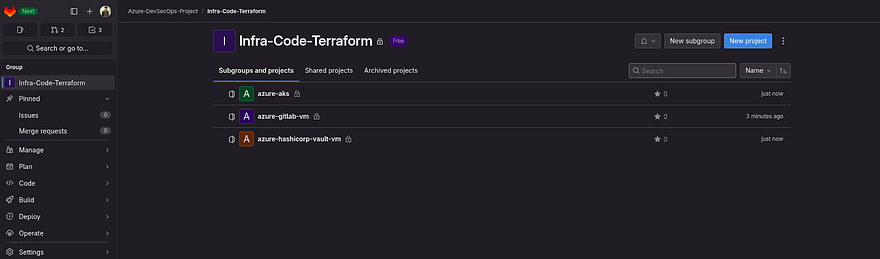
Here, we have created all three subgroups in our Azure-DevSecOps-Project Group.
I did not include the creation of the other two subgroups because it will be the same as we created in the previous step. So, don’t forget to do that

Now, we will be going to work on our first subgroup which is Infra-Code-Terraform because to deploy any application or apply any manifest file we need infrastructure, right?
So, Let’s do that.
But before that, there is one important thing that we need to do.
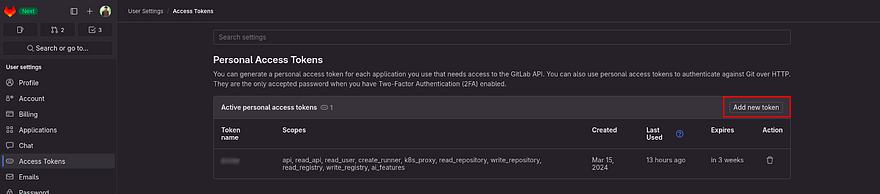
We need to create a Personal Access token. So that, we will be able to clone the repo and push the changes.
As you observed, our Project is Private. So all the repositories will be Private.
We can generate Access tokens for each repo. But that feature is available in GitLab Premium. So, we will be creating our traditional Global Personal Access Token.
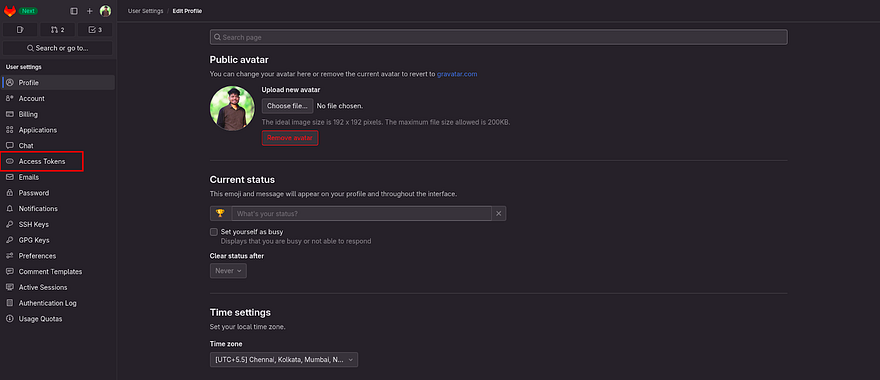
Click on Your Profile and then navigate to Edit Profile
Click on Access Tokens
Click on Add new token
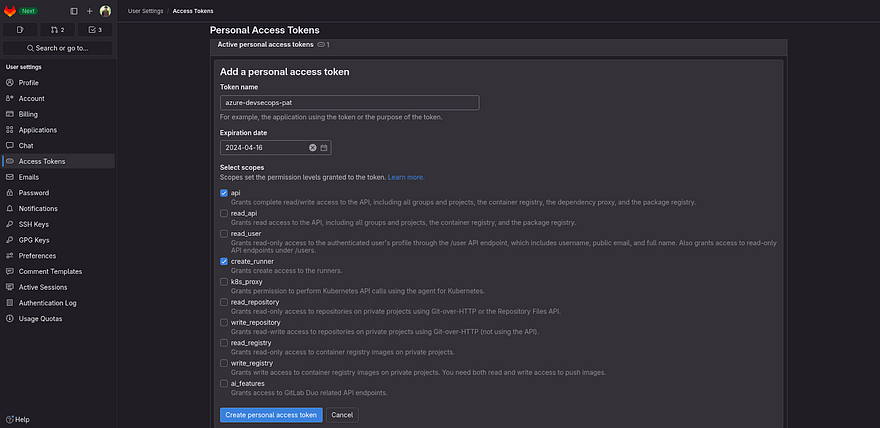
Provide the name of your token and check the below boxes as shown in the below snippet and click on Create personal access token
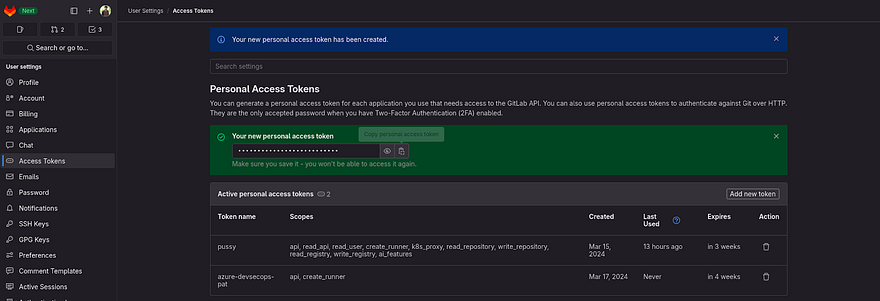
Copy your token and keep it somewhere, because we will be going to use that multiple times.
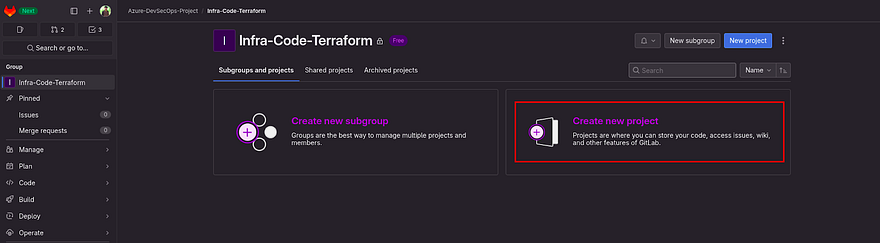
Now, get back to our Group and navigate to the Infra-Code-Terraform subgroup
We will be going to create three repositories
Click on Create new project
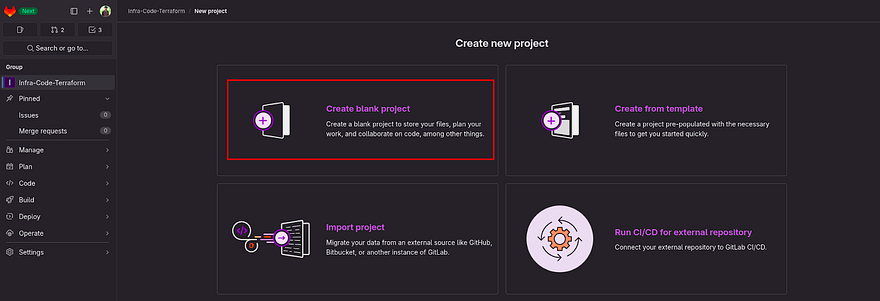
Click on Create blank project to create the repository
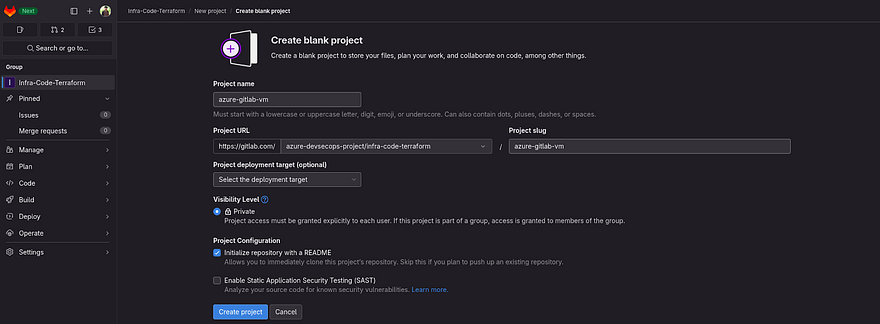
Provide the name of your project, as you know this repository will be dedicated to creating Azure VM. So, our Gitlab Pipeline will run on this VM instead of Shared runners.
Click on Create Project
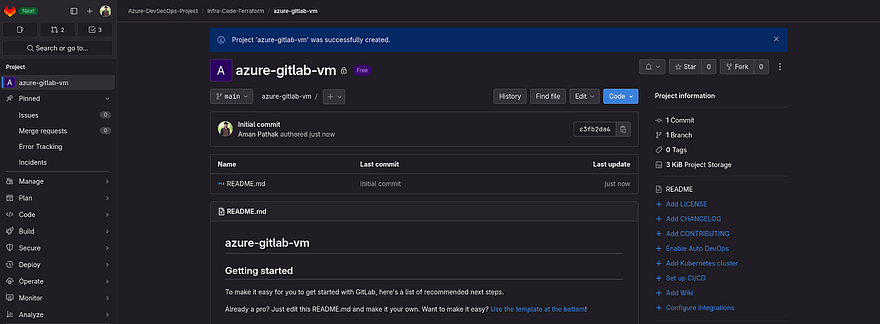
Our first repository has been created.
Note: Don’t get confused if I am saying Project or Repository because both are the same in GitLab
Now, to reduce the length of this blog. Kindly create two more Projects in the Infra-Code-Terraform subgroup which you can see below screenshot
Before going to create infra from each repository, let’s see the prerequisites which we will be going to do in the next steps.
We have configured the remote terraform backend. So, the tfstate file will be going to store on Azure Storage Accounts. We can also use the GitLab feature to store tfstate here only but for the current Project, we are going to keep our tfstate on Azure Storage Accounts.
To create infra on Azure cloud, we need to store credentials in the GitLab variable.
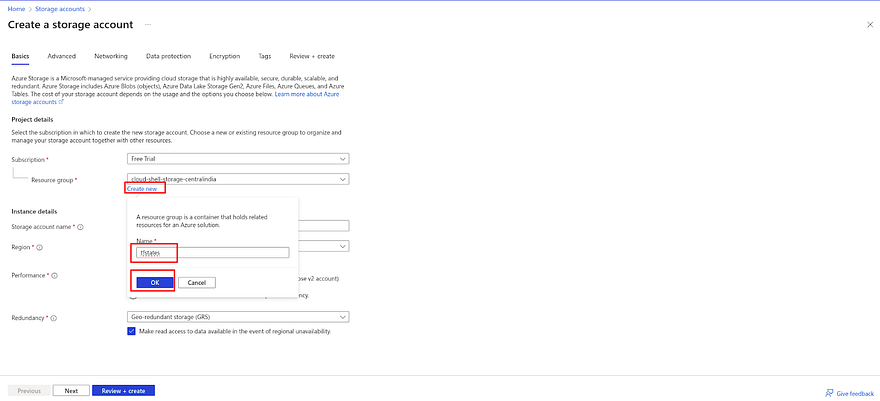
Now, we are going to create an Azure Storage account to store our tfstate file there.
Go to the Storage Account in your Azure Account and click on Create.

Initially, create a dedicated resource group for our tfstate file.
Click on Create new provide the name of your resource group and click on OK
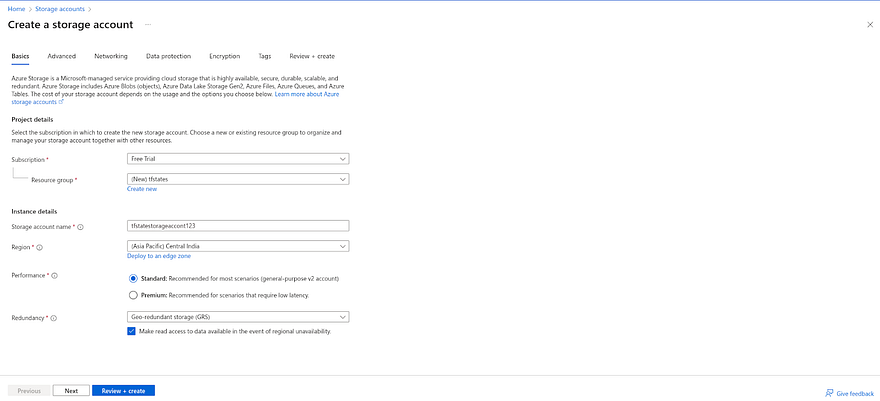
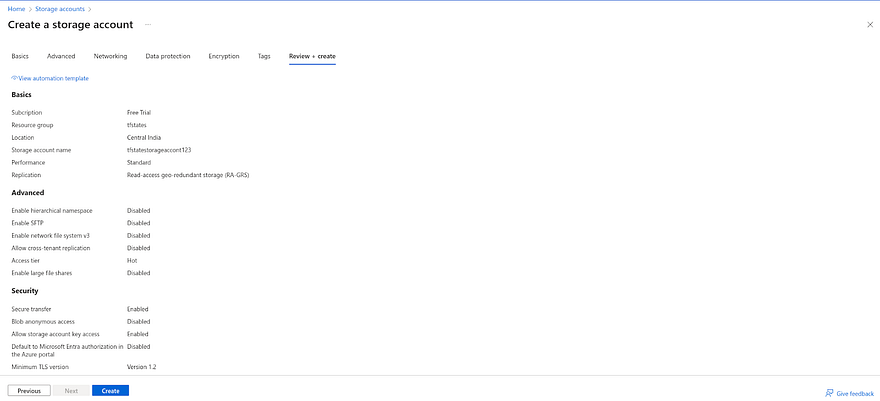
Once you have created Resource Group, provide the unique name to create your Storage Account and click on Review+Create
Click on Create
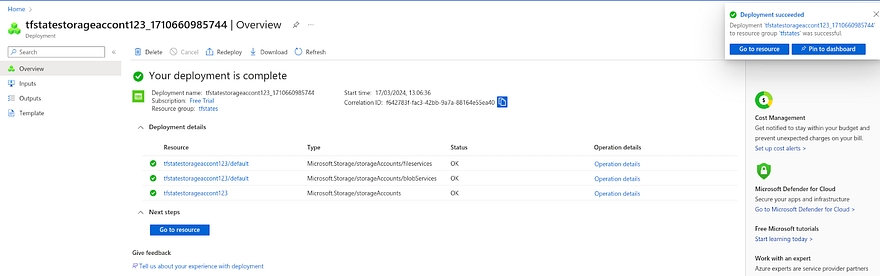
Once the deployment is complete, click on Go to the resource
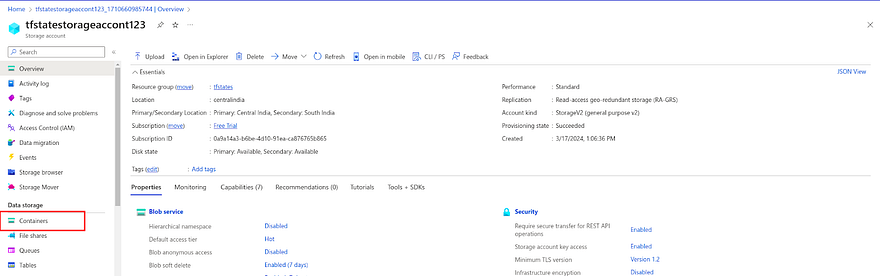
Now, we need to create a container inside our Azure Storage Account.
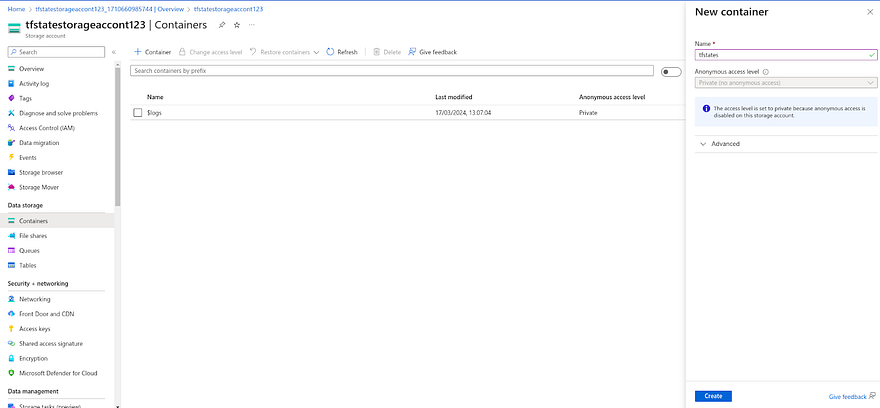
Click on Container

Provide the name of your container and click on Create
Now, we have completed the setup for our terraform tfstate file

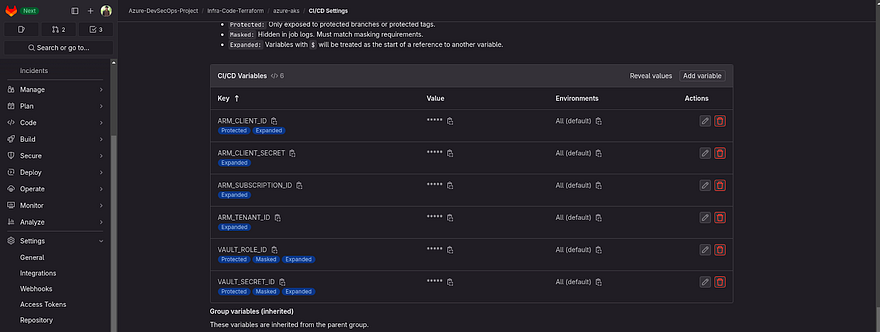
Our next step is to add the credentials of our Azure Account in GitLab.
Below are the credentials that need to be added to the GitLab variables section
Right now, we have only Subscription ID & Tenant ID. Therefore, we need to generate client id and client secret.
Note: Client id and client secret are used to create service on Azure Cloud. It’s like you need to have permission to create something on Azure Cloud. Only Subscription ID and tenant ID would not be enough to do that.
Let’s do that.
Search for Entra ID in your Azure Account and click on it

Once, you land on the Entra ID page. Click on App registrations

Click on New registration

Provide the name of your application and click on Register
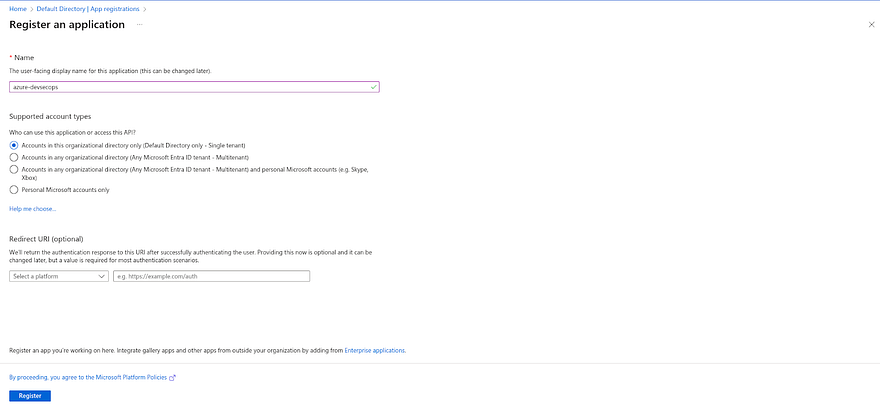
Once you click on Register
You will be landed on the page that is shown in below snippet
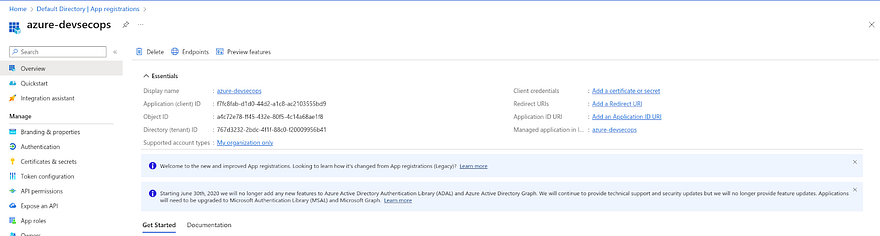
Now, we have completed the app registration. But, the app must have access to our Azure Subscription to create services.
To do that, we need to provide an IAM role to the app that we registered in the previous step
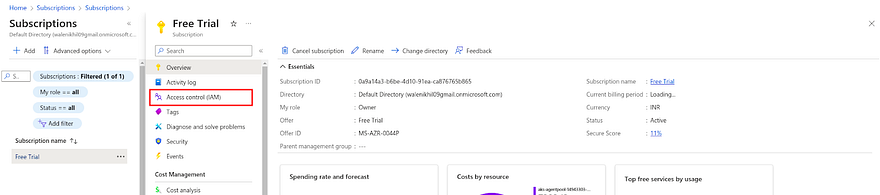
Search Subscription in your Azure Account and click on it

You will be landed on the Subscription page
Click on Access Control(IAM)
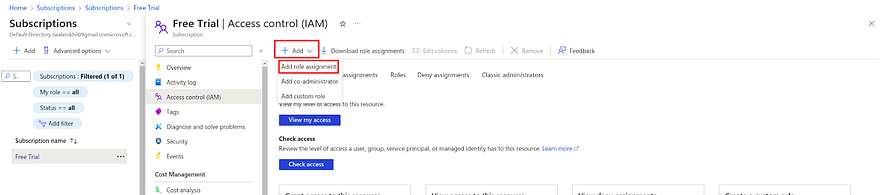
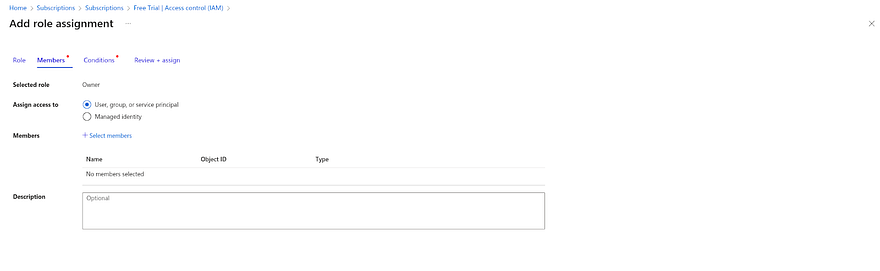
Click on Add and navigate to the Add role assignment
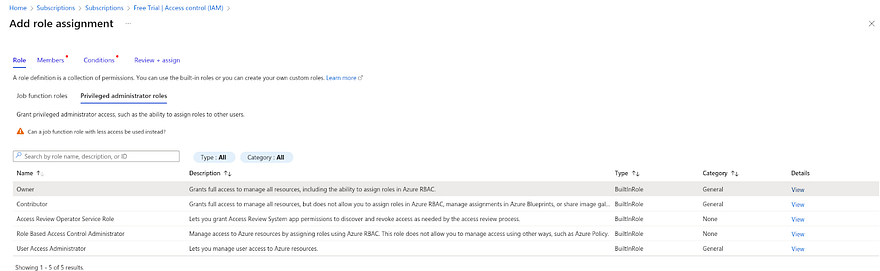
In the role section, Click on Privileged administrator roles and select Owner.
Note: To give the Owner role to any app won’t happen in any Organization. This demonstration is for Practice purposes only. So, we are giving it Owner access
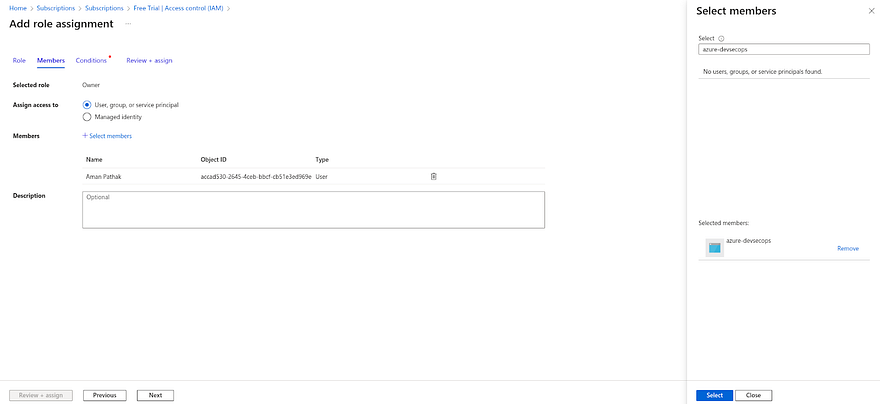
Now, Go to Members and click on Select members
Search for the member name that you have provided to create app registration.
In my case, I have provided azure-devsecops. So, select that member and click on Select
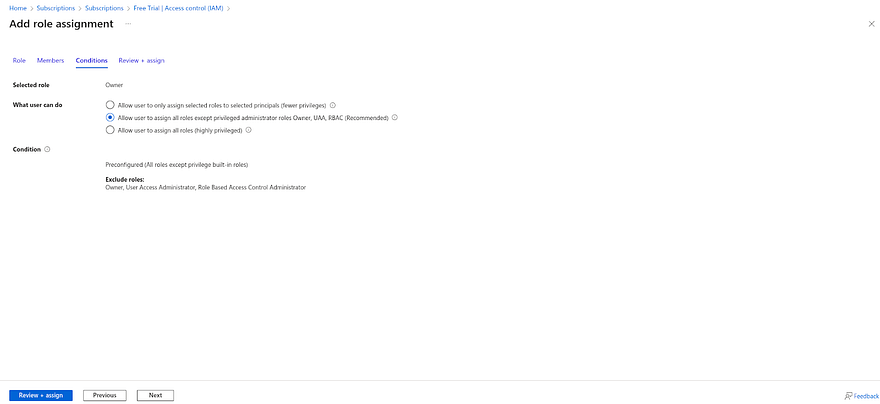
Click on Conditions Select the second option to provide decent privileges and click on Review+assign
Once, the role assignment is complete.
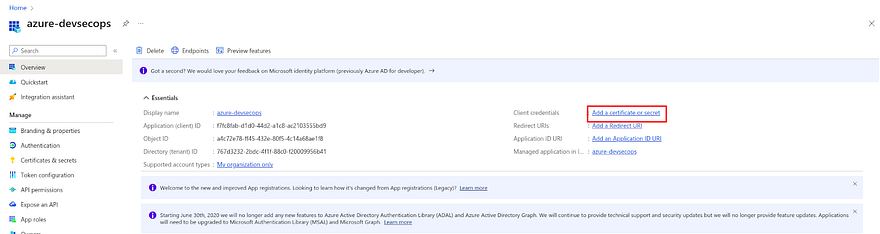
Navigate to the app registration in Entra ID and go to the app that you created earlier.
Click on Add a Certificate or secret
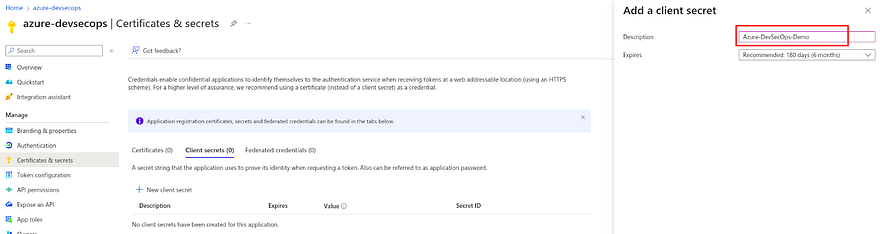
Click on New Client secret
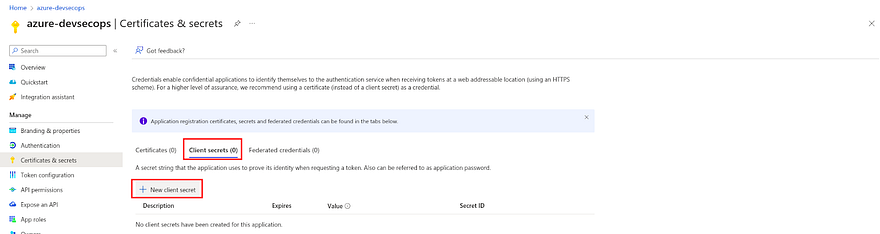
Provide the description and click on Add
Now, you have the client's secret
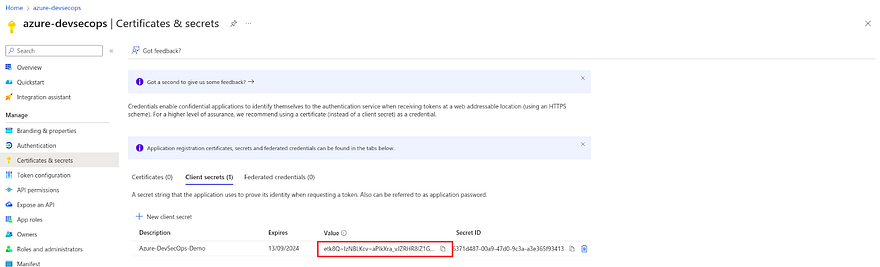
To get the client ID, navigate to the previous page and copy the client ID
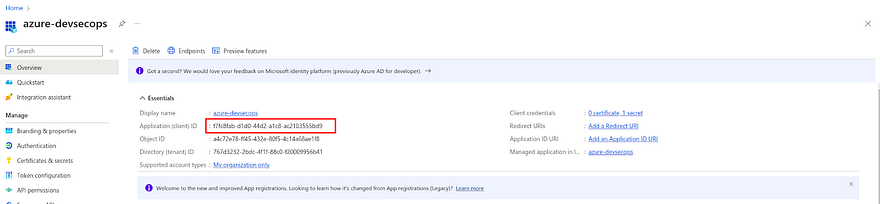
To get the tenant ID, go to Entra ID and copy the tenant ID
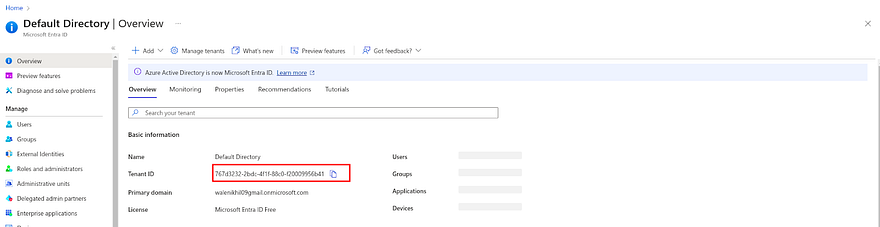
To get the subscription id, go to subscription and copy the subscription id

Now, we are set to add our credentials in GitLab Repositories for Infra-Code-Terraform.
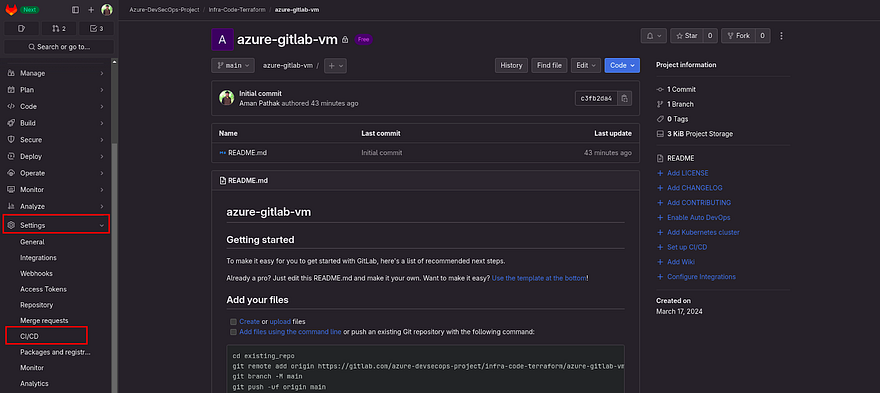
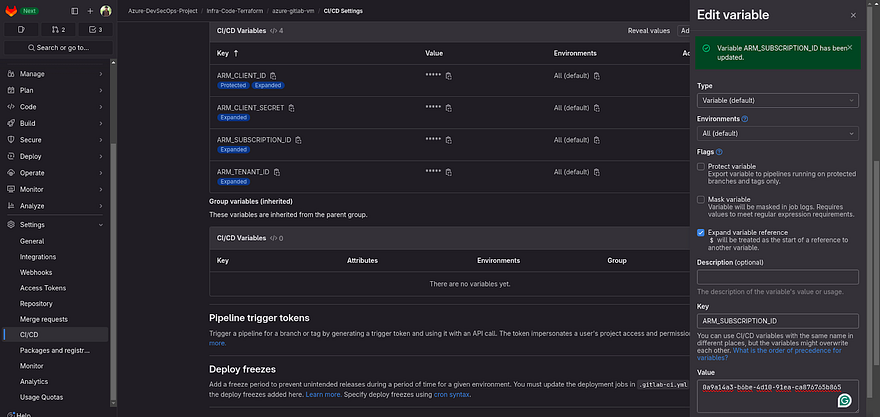
Go to the repository and click on CICD
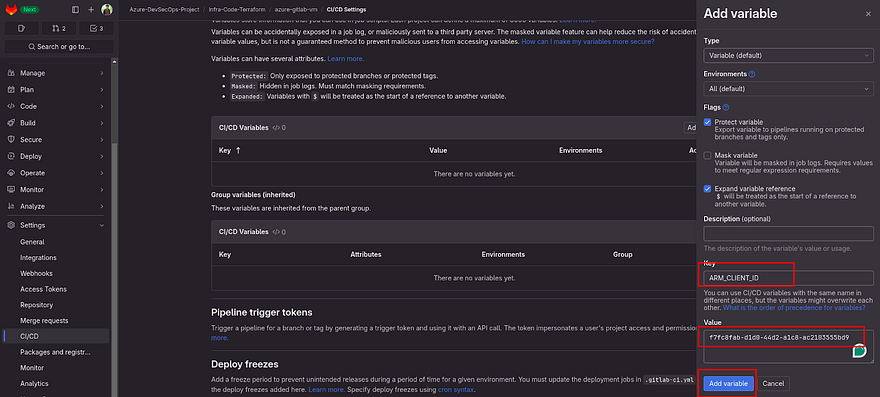
Now, add the below Key with the correct value that we received from the previous steps.
Try to check the Mask and Protected variables in flags while adding the variables. So, it won’t be shown in the output in the pipeline.
ARM_CLIENT_ID
ARM_CLIENT_SECRET
ARM_SUBSCRIPTION_ID
ARM_TENANT_ID
Once, you add all four keys and values. It should look like the below snippet.
Note: You need these four keys and values in the other two repositories which are azure-hashicorp-vault-vm and azure-aks. Because we will create infra from that repository as well

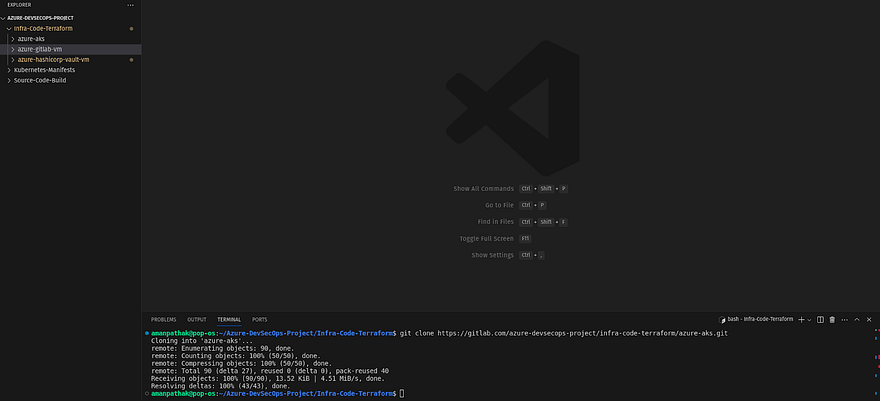
Open the VS Code, and I will recommend you create the same directory structure as gitlab including group and subgroup to avoid any confusion
You can refer to the below snippet

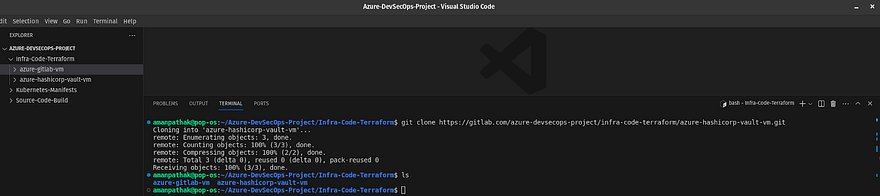
Now, clone the azure-gitlab-vm repository

Navigate to the Infra-code-terraform directory on VS Code and run the below command to clone the repository
git clone https://gitlab.com/<your-gitlab-repo>.git
VS Code will prompt you for the username and password for GitLab. So, provide your GitLab username and the Personal Access Token that we have generated in the earlier steps

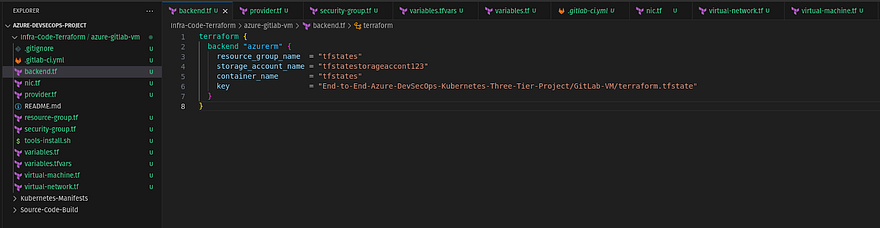
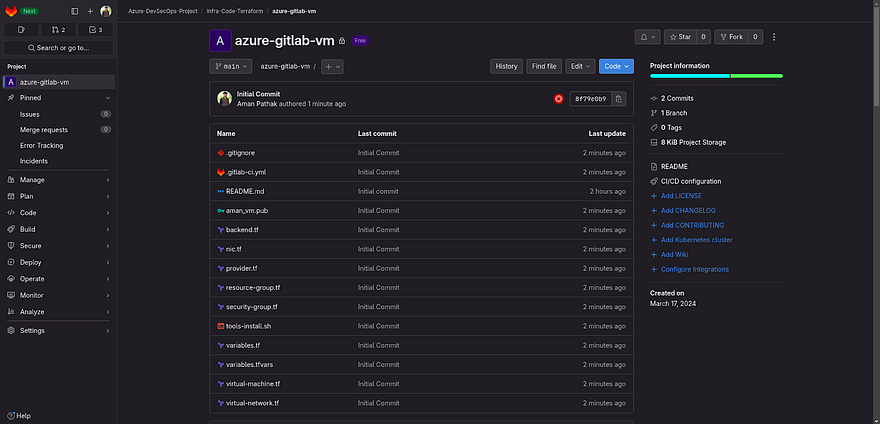
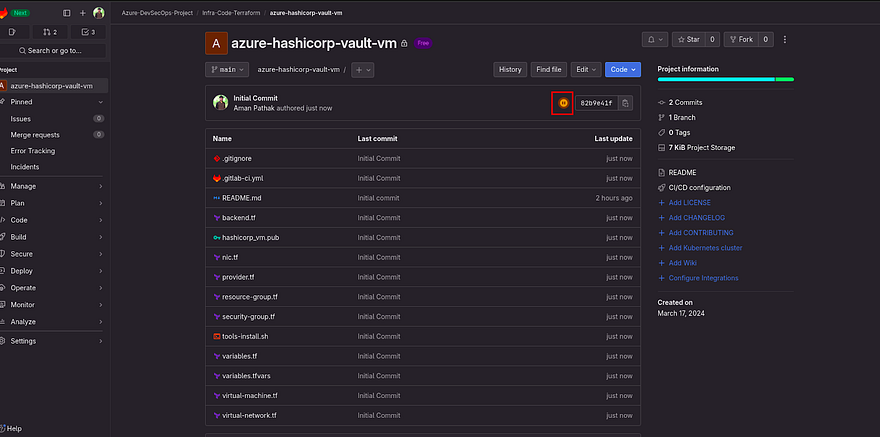
In the below snippet, I have added the Terraform Scripts along with the gitlab-ci.yml file to automate the infrastructure deployment on Azure Cloud.
Kindly go through the Terraform Script and gitlab pipeline script. Feel free to modify it accordingly
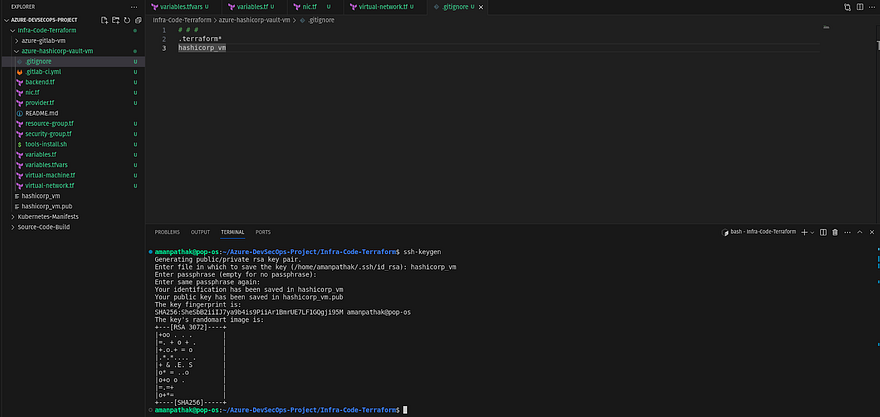
Before pushing these scripts to the GitLab Repository, there is one prerequisite which is the public key for our Azure VM.
Generate the public and private SSH keys using the below command
ssh-keygen
You can see in the left pane, the aman_vm file is newly created. So, we will use a private key to connect with our instance
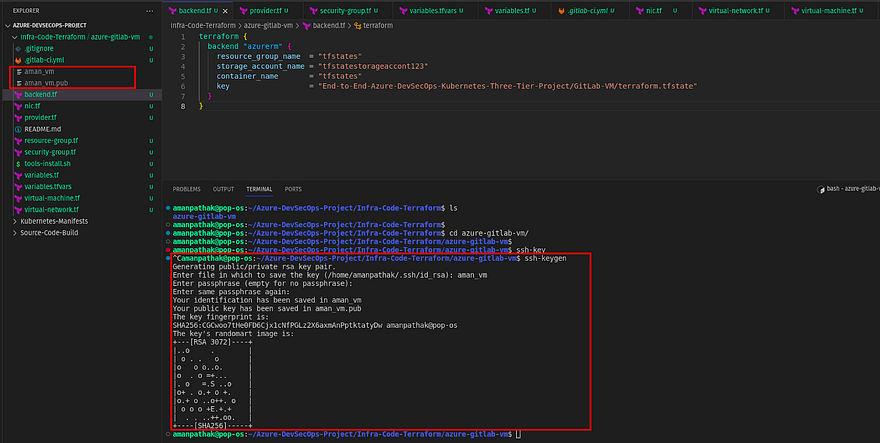
If you observe, we have private keys as well in the same repository and if we push the changes then the private key will also be pushed to the repo which is the worst practice.
Usually, Organizations keep their key in Azure Key Store but for now, we are keeping it in our local machine.
To do that, add a private key file name in your .gitignore file like below
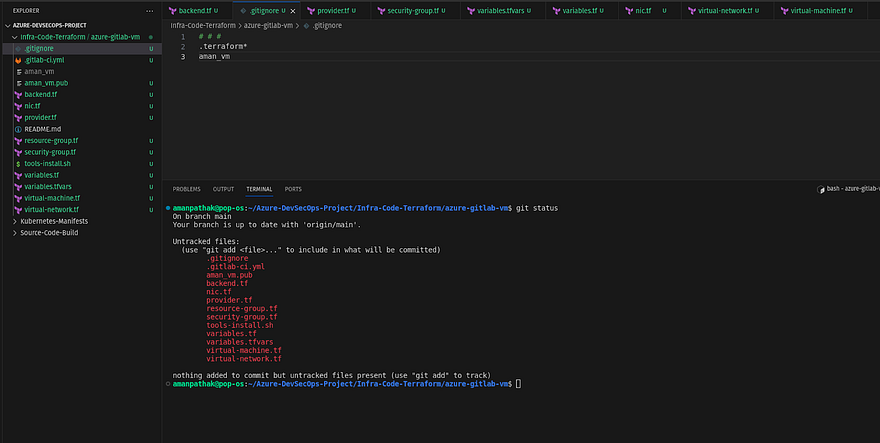
Now, push your changes to GitLab
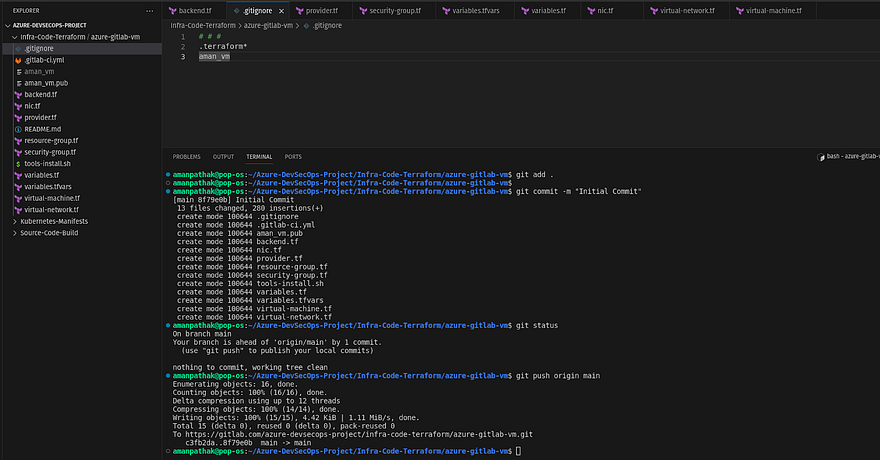
As soon as you push the changes to the repo, you will see in your GitLab repository that there is a pipeline created that was running and failed.
Let’s troubleshoot the pipeline error
As you can see in the below error there is one white space added in the variables value which should not be added.
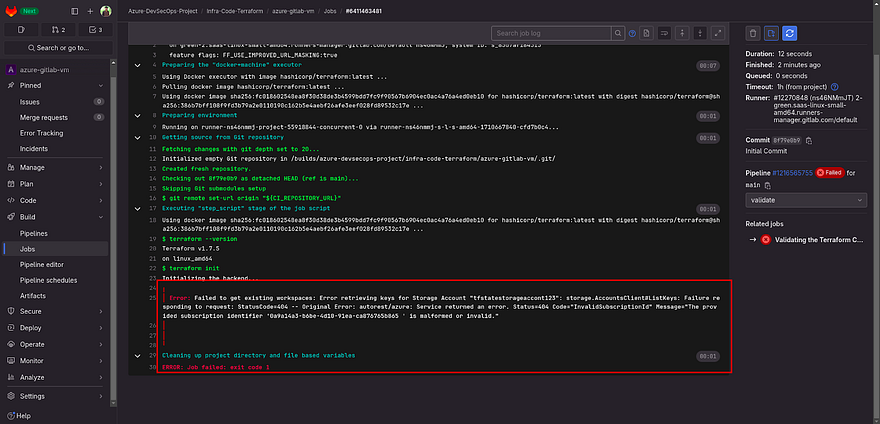
Go to CICD navigate to CICD and edit the Subscription variable.
Now, some of you won’t get this error because you are perfect in copy and paste thing
Now, we will run our pipeline again
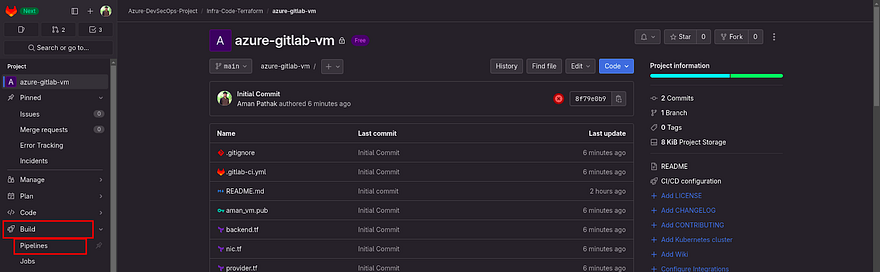
Click on Build to expand the options and click on Pipelines
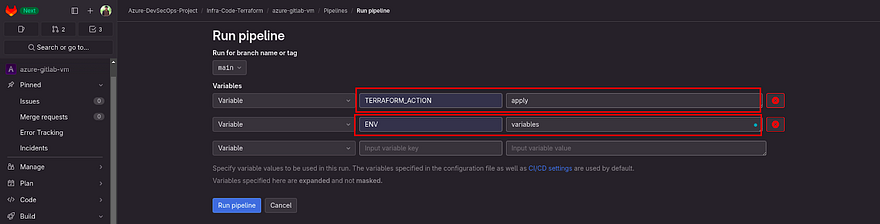
Click on Run Pipeline

Once you click on Run Pipeline, It will ask you for the variables.
So, if you went through the gitlab pipeline file you will have seen that I have added two variables which are TERRAFORM_ACTION and ENV.
TERRAFORM_ACTION is to provide whether the pipeline will create the infra or destroy the infrastructure where you have to either apply or destroy.
ENV is to provide the tfvars file, usually for multiple environments, we have multiple tfvars files. So, you can change the tfvars file name as well.
Right now, we want to create infra that's why I am providing apply as TERRAFORM_ACTION and variables as ENV and clicking on Run pipeline
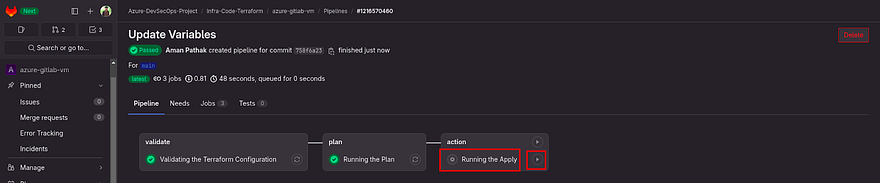
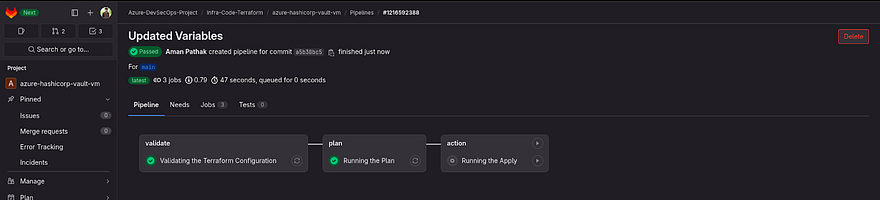
After the plan, the pipeline won’t run automatically.
As you know, both apply and destroy are critical. So, you need to see a blueprint which means what kind of services will be created or destroyed.
Once you ensure that plan is working according to you, then click on the play button which appears on the right of Running the Apply.
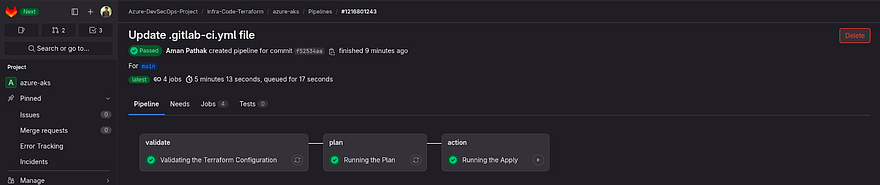
Now, you can see our pipeline has been created successfully
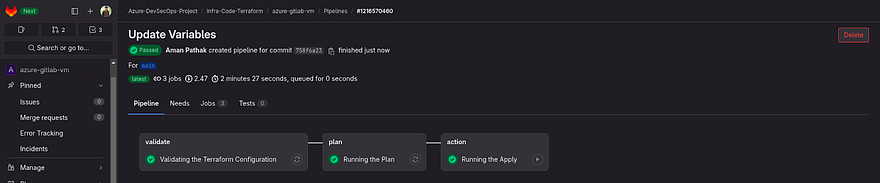
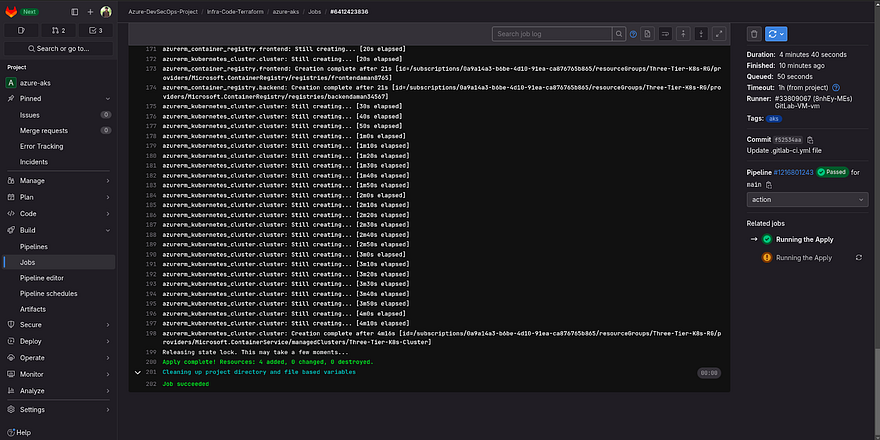
Check the logs of the action job
As it is showing the services have been created
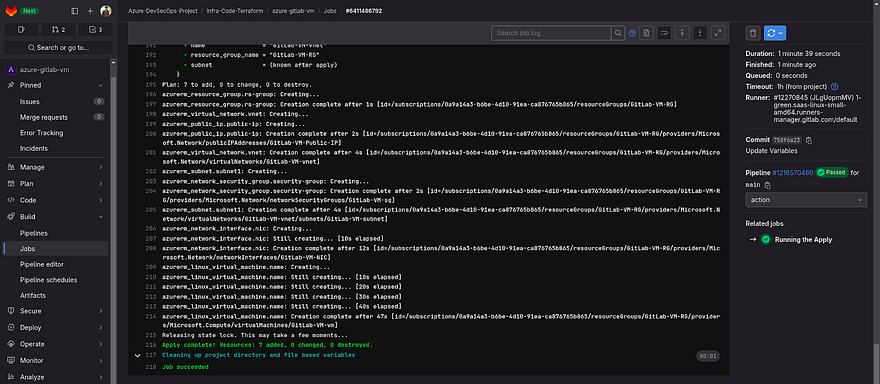
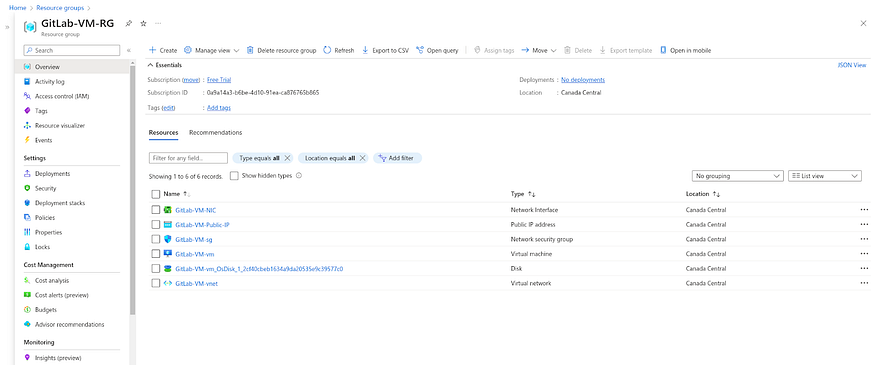
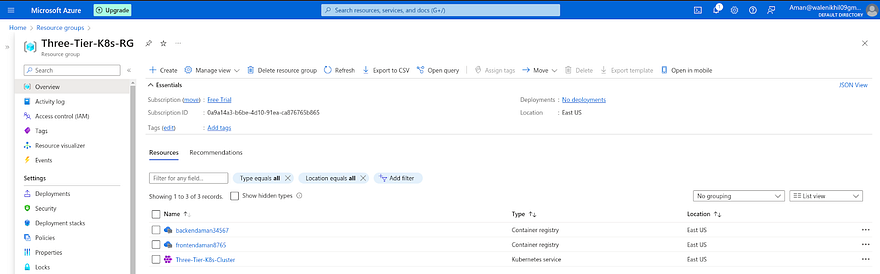
Go to your Azure Account and navigate to the Resource Group and you will be able to see all the services that are created by Pipeline
Once the GitLab VM is created. The main purpose of this VM is to run all further pipelines on this VM instead of GitLab shared runners.
This will be our self-hosted runner to run all the pipelines on our VM. This will ensure that security will be in our hands and if something goes wrong with the runner, we will be going to responsible for this which is one of the main advantages from the business perspective
To do that, We need to log in
Go to the Azure VM and select our created VM

Our username is Azure and public IP you need to copy from the above snippet.
To log in, you need the private key that we have generated
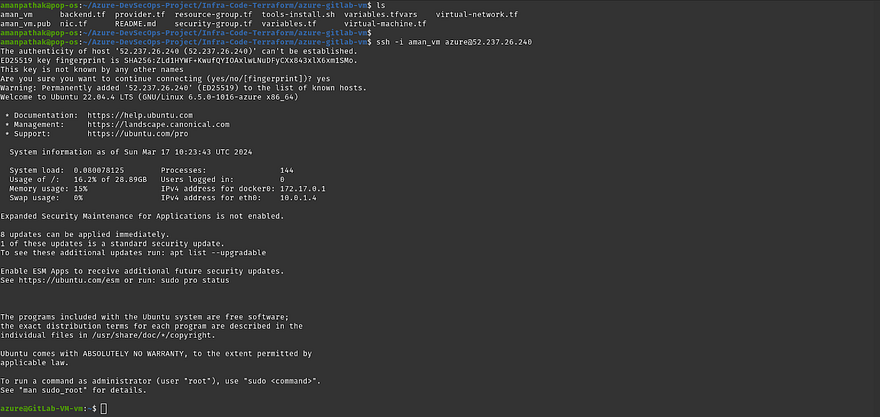
Run the below command to login
ssh -i aman_vm azure@<gitlab-vm-public-ip>
Now, we need to install the Gitlab runner on our Gitlab VM to run all the pipelines from the VM
For that, you should know which repository’s pipelines need to run on your VM
Suppose, I need to create the hashicorp vault server and there is a pipeline I have created if I want to run the hashicorp vault server repository pipeline on a Gitlab VM. I need to go to the hashicorp vault server repository and the repository will give me a token to run the pipeline on GitLab VM.
Hope you understand the Gitlab Runners concept.
Before going to get the token, we need to install the runner. You don’t need to worry about that. GitLab provides the command in each repository to install the GitLab-runner.
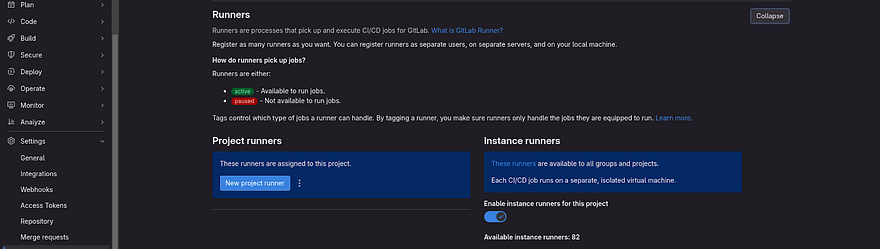
To get the commands, Go to the azure-hashicorp-vault-vm repository navigate to Settings, and then click on CICD.
Click on Expand against Runners
Click on the three dots which are right on the New project runner
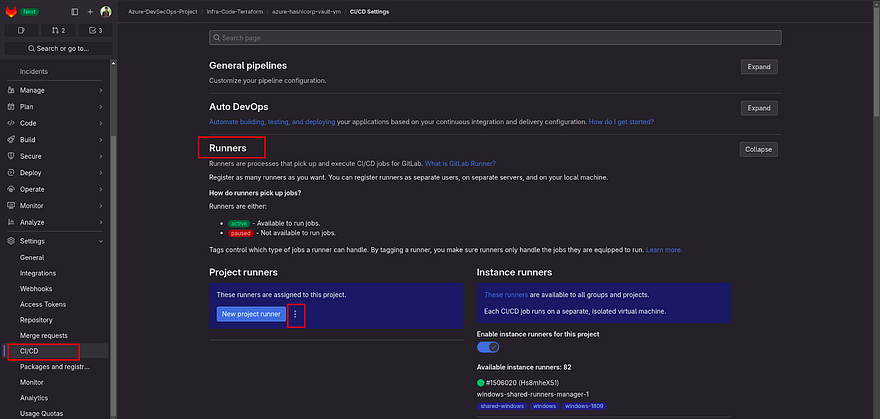
In the above snippet, you have observed that on the left side, we can create our own Gitlab Runner and on the right side shared runners are available which are running pipelines
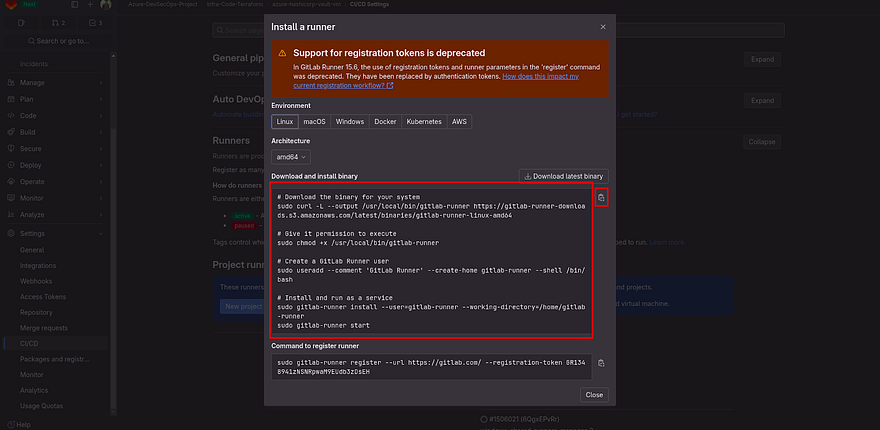
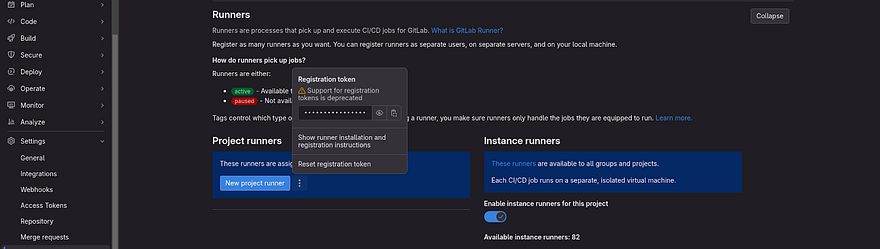
As our first task is to install Runner, click on Show runner installation and registration instructions

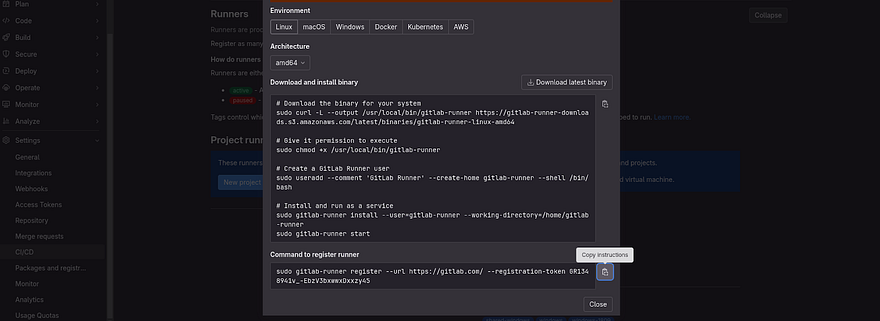
As our VM OS is Linux, we will use the below commands to install Gitlab Runner on our VM
Copy the commands of the first big box by clicking on a clipboard which is showing on the left
Run the command on your VM
Don’t worry if you get the error like in the below snippet.
It means gitlab-runner already exists
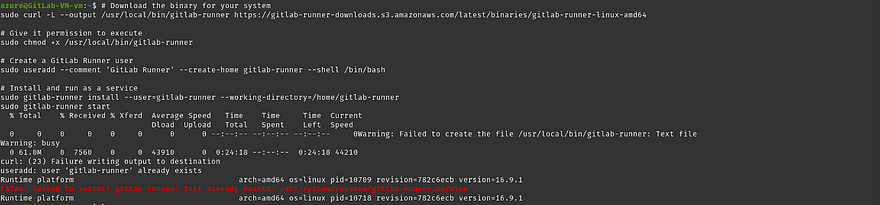
Check the runner status by the below command
sudo gitlab-runner status

Now, the gitlab runner is installed. So, we are ready to register the runner to the hashicorp-vault repository
Go to the Gitlab repository from where you have copied the installation instructions
This time, you need to copy the command which is showing in the small box
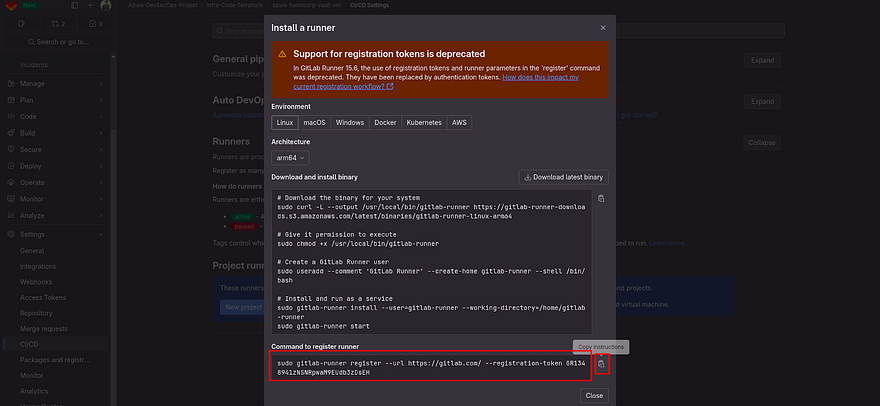
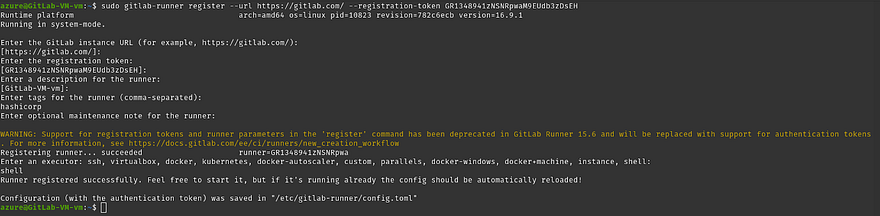
Run the command on your Azure VM
Once you run the command it will ask you some questions. You can skip all the questions except tags for the runner and Enter an executor which is highlighted in the below screenshot
Note: tags are the identity to run the pipeline on which runner, The tags are specified in the gitlab pipeline to run the particular stage on the particular runner and executor means that your runner will run the instructions that you have provided in the .gitlab-ci.yml whether it will be docker, shell, etc.
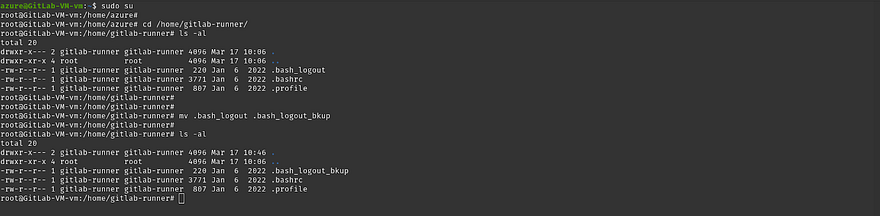
But, if we try to run our pipeline on this runner. It won’t run our pipeline because of one file which is .bash_logout
To get rid of the issue, just change the file of .bash_logout to something else
sudo su
cd /home/gitlab-runner/
mv .bash_logout .bash_logout_bkup
ls -al
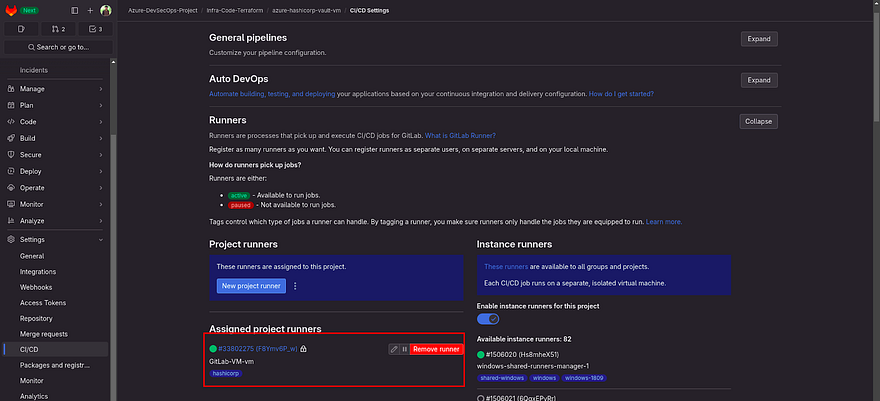
Now, Go to your hashicorp-vault repository and navigate to runners
If your runner is in green then Congratulations, your runner is perfectly added and now it can run the hashicorp vault pipeline on itself.
So, our GitLab VM is configured. So, we will be going to deploy our next services which are related to HashiCorp Vault.
Hope you already added the required variables(Azure Credentials) which we did in our earlier steps. If yes, let’s go
Clone the repository on your VS code
I have added the Terraform Scripts and gitlab pipeline script for the hashicorp server as well.
Kindly, go through the code
Also, I have generated the SSH files for the hashicorp vault server and added the public key name in the virtual-machine.tf file and the private key in the .gitiginore file
Now, I have pushed the changes to GitLab and you can see the pipeline started
Our Pipeline was successful for the Plan. So, we can run the apply
Our application is completed
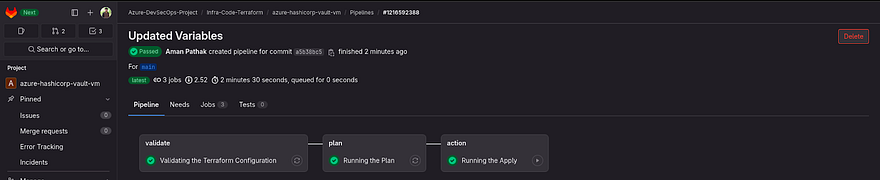
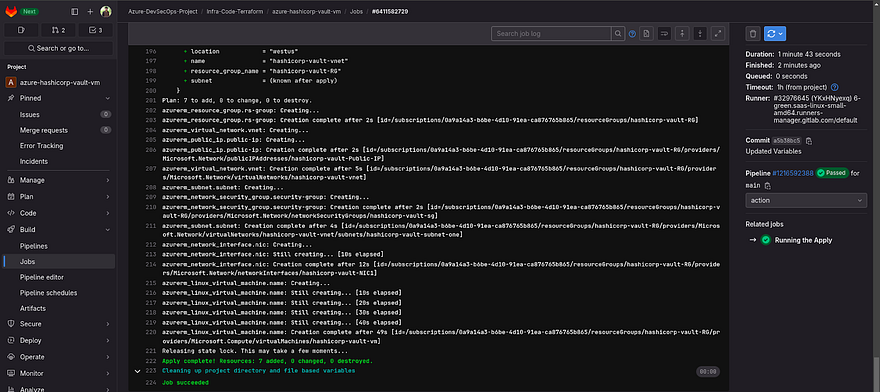
Let’s see the logs by clicking on the action
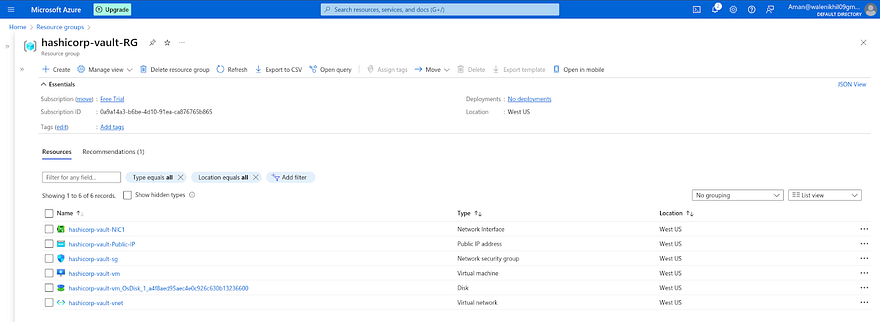
Let’s go to Azure Account and check the Resource Group to see the created services
The Services are available that we have created using Terraform
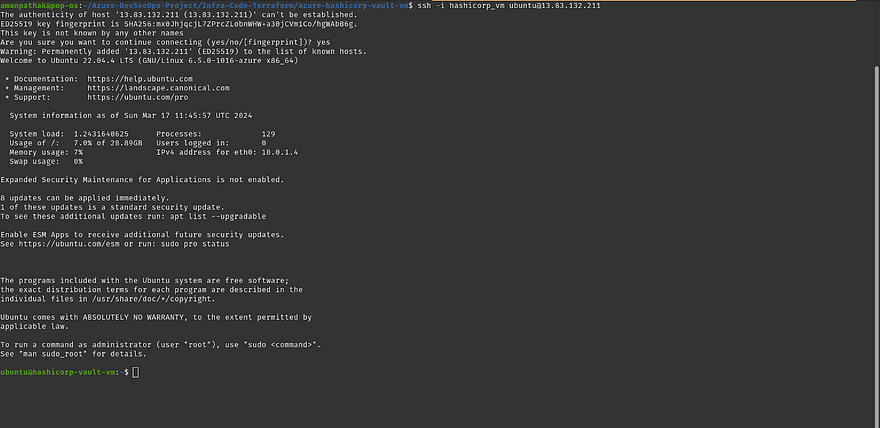
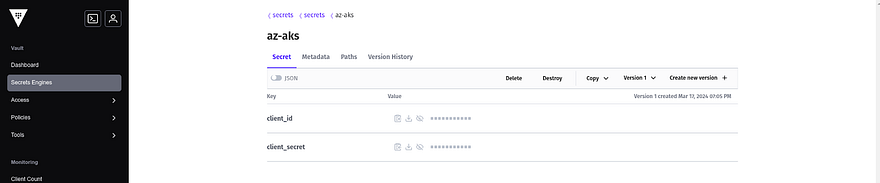
Now, we need to set up our HashiCorp Vault server as we are going to store our client ID and client secret for Azure Kubernetes Secret
LogIn to HashiCorp Vault VM
Run the below command to start the vault in the background
nohup vault server -dev -dev-listen-address=”0.0.0.0:8200" > vault.log 2>&1 &

To access the vault from the console, you need to have a Token which is stored in the vault.log file that is created by running on above command
cat vault.log | tail -10
Copy the Root token

Now, Access the Vault GUI by copying the Public IP of the Vault Server with port 8200 and pasting the copied Root token
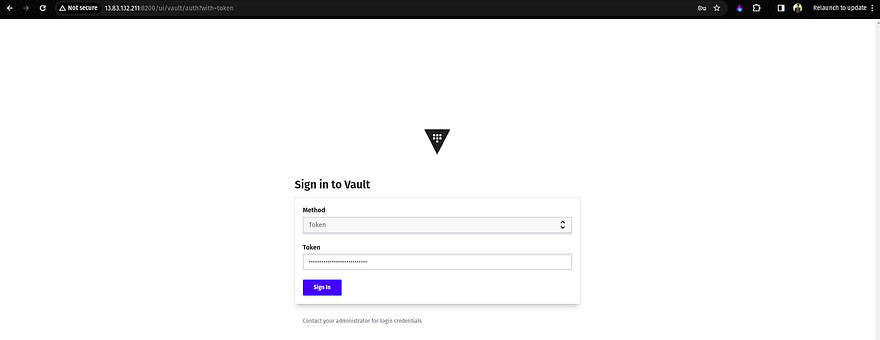
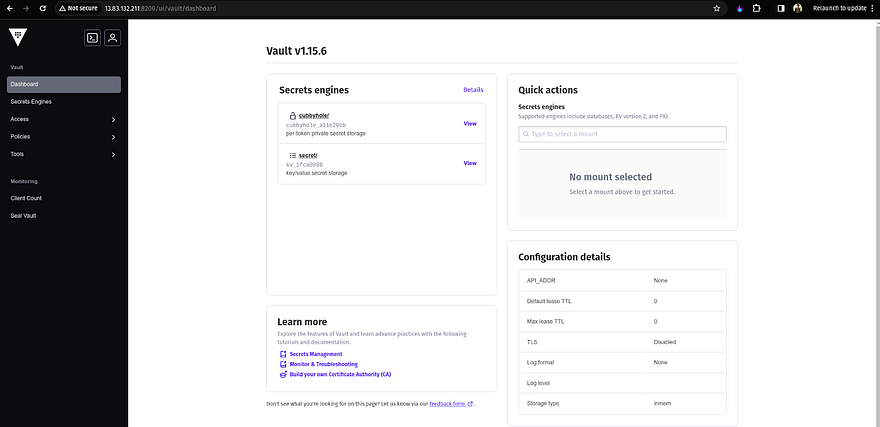
Once you log in, you will see UI like the below snippet
Now, export the vault address by running the below command
export VAULT_ADDR=’http://0.0.0.0:8200'

We are going to keep the secrets in the vault server. So, those secrets should be accessible to authorized applications only.
To do that, we have roles and policies in the HashiCorp vault
We will create a role then we will create a policy that will bind with that role
Now, enable the approle to create the role
vault auth enable approle

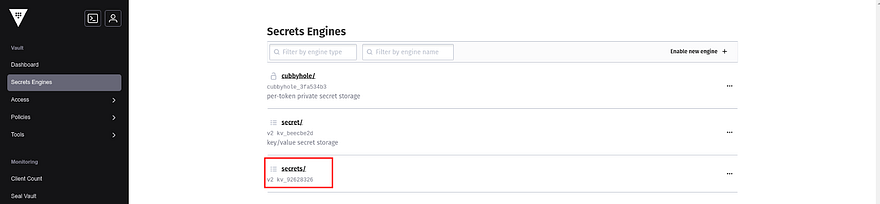
Now, enable the secret to create secrets
vault secrets enable -path=secrets kv-v2

In the Vault console, you can see secrets are present
Now, create a Secret by providing the path and then add your client ID and client secret credentials
The credentials are added
Now, create the policy where we specify that the path of the secret can be only read by the app role
vault policy write terraform - <<EOF
path "secrets/access/*" {
capabilities = ["read"]
}
EOF

Now, create the approle and associate it with the policy that we have created above
vault write auth/approle/role/terraform \
secret_id_ttl=60m \
token_num_uses=60 \
token_ttl=60m \
token_max_ttl=60m \
secret_id_num_uses=60 \
token_policies=terraform

Now, we need the role ID which will help us to integrate with Terraform while creating AKS
vault read auth/approle/role/terraform/role-id

Now, copy the secret ID by running the below command
vault write -f auth/approle/role/terraform/secret-id
Note: If you get any error such as an invalid role or secret ID then delete the approle manually from the Vaut console and enable the approle, then create the approle with association of policy and get the new secrets and role ID by running the previous and current commands. This is happening because we have set the time to expire the role ID and secret it.

Once, you get the role ID and secret ID. Then, add them to your AKS GitLab CICD Variables Section with proper keys and values.
So, our HashiCorp VM is configured. So, we will be deploying our next service which is Azure Kubernetes Service.
Hope you already added the required variables(Azure Credentials) which we did in our earlier steps. If yes, let’s go
Clone the azure-aks repository on your VS code
I have added the Terraform Scripts and gitlab pipeline script for Azure Kubernetes Service as well.
Kindly, go through the code
Also, I have generated the SSH files for Azure Kubernetes Service Node Groups and added the public key name in the virtual-machine.tf file and the private key in the .gitiginore file.
Before going to push the changes and start the pipeline. I have added the Gitlab Runner as our Gitlab VM on azure-aks repository
AKS GitLab Runner Register
Keep the tags and executor as it is
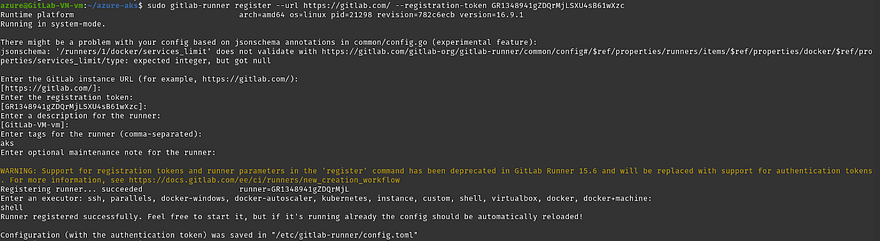
I have pushed the changes to GitLab and you can see the pipeline started
Let’s see the logs by clicking on the action
Let’s go to Azure Account and check the Resource Group to see the created services
The Services are available that we have created using Terraform
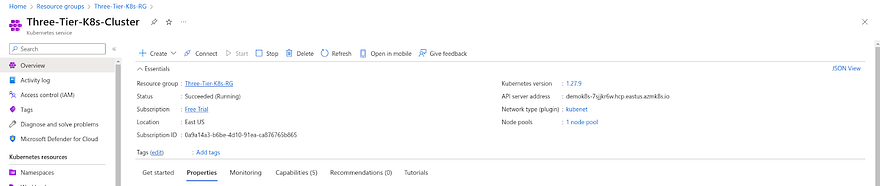
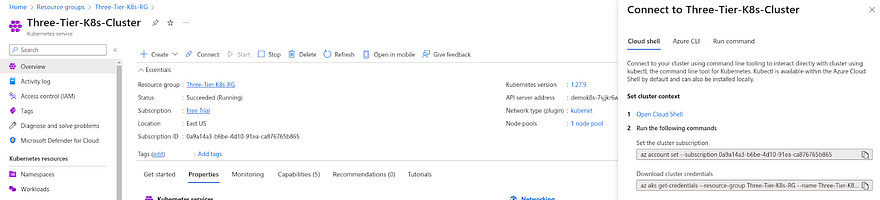
Now, we need to set up our Azure Kubernetes Cluster on Azure GitLab VM where we installed runners
To do that, Click on Azure Kubernetes Service which is shown in the above screenshot
Click on Connect
Copy the first command and run it into your Azure GitLab VM
We ran the command

Now, Copy the second command and run it on your Azure GitLab VM
You can validate whether your Azure AKS is working fine or not by running the below command
kubectl get nodes

Now, some prerequisites need to be completed for our Azure Kubernetes Cluster.
We need to configure nginx ingress controllers to deploy our application on the internet.
We need to configure Monitoring for our Kubernetes Cluster
We need to configure SSL for our application
Let’s do it one by one
Install & Configure nginx ingress controller
Create the dedicated namespace for the ingress controller
kubectl create namespace ingress-basic

Add the nginx controller helm repo and update the repo
helm repo add ingress-nginx https://kubernetes.github.io/ingress-nginx
helm repo update

Before running the next command, Go to Azure Account search for Azure Load Balancer, and click on it

There can be many load balancers if you have created if the load balancer name is Kubernetes click on it

Once you land on the Kubernetes load balancer page, Click on Frontend IP Configuration and copy the IP address

Now, we need to install the helm chart but in the below command don’t forget to replace the <PUBLIC-IP> with your copied Public IP that you have done in the previous steps
helm install ingress-nginx ingress-nginx/ingress-nginx \
    --namespace ingress-basic \
    --set controller.replicaCount=2 \
    --set controller.nodeSelector."kubernetes\.io/os"=linux \
    --set defaultBackend.nodeSelector."beta\.kubernetes\.io/os"=linux \
    --set controller.service.externalTrafficPolicy=Local \
    --set controller.service.loadBalancerIP="<PUBLIC-IP>"
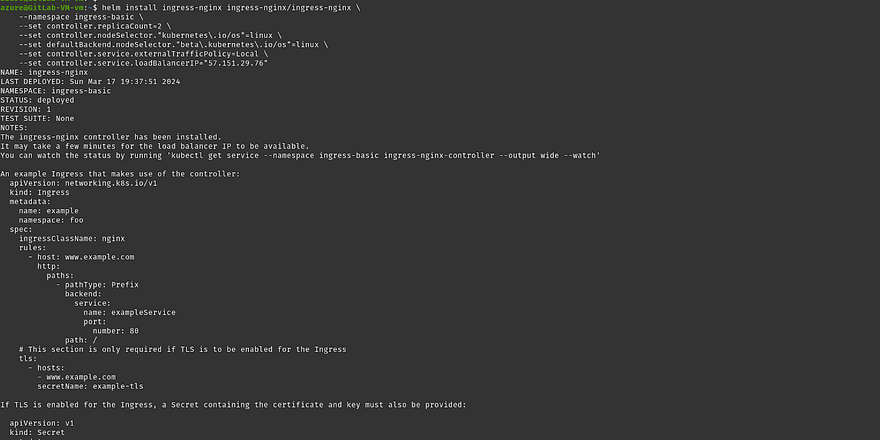
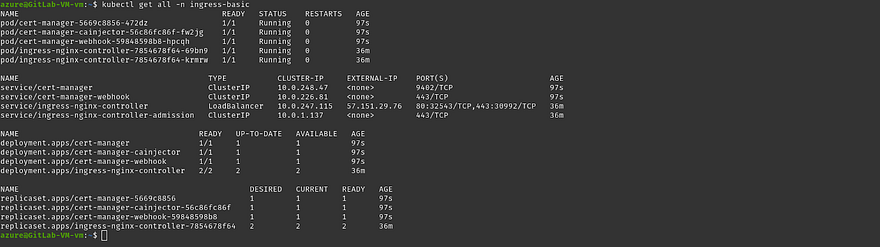
To validate whether ingress is installed or not run the below command and make sure all pods must be running

Now, we will be going to configure Monitoring in which we will use Prometheus and Grafana
To do that, create a namespace for Prometheus
kubectl create ns prometheus
Add the Prometheus helm repo and update the repo
helm repo add prometheus-community https://prometheus-community.github.io/helm-charts
helm repo update

Install the Prometheus Helm chart
helm install prometheus prometheus-community/prometheus -n prometheus
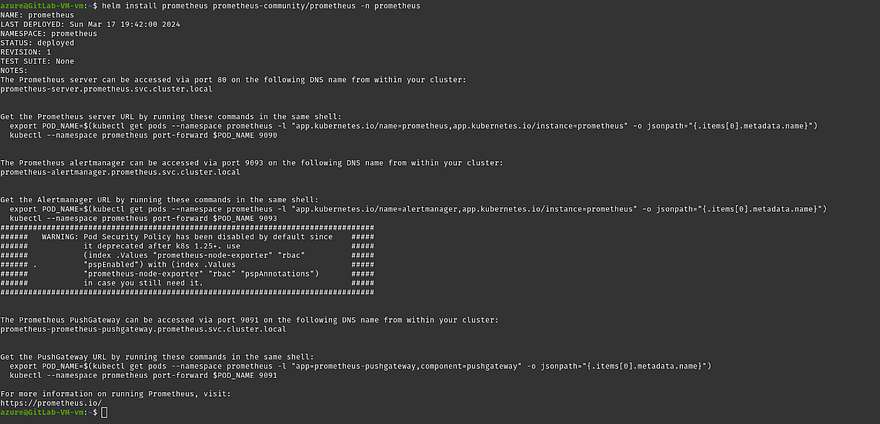
We need to deploy our Prometheus server to the external world
To do that, we will be going to change the service type of Prometheus Service from NodePort to LoadBalancer
Firstly, let’s check the services

Run the below command to expose the Prometheus service outside of our cluster
kubectl expose service prometheus-server --type=LoadBalancer --target-port=9090 --name=prometheus-server-ext -n prometheus
Once you run the command, the Prometheus will be able to access from outside of the cluster
Run the below command to get the external IP to access prometheus
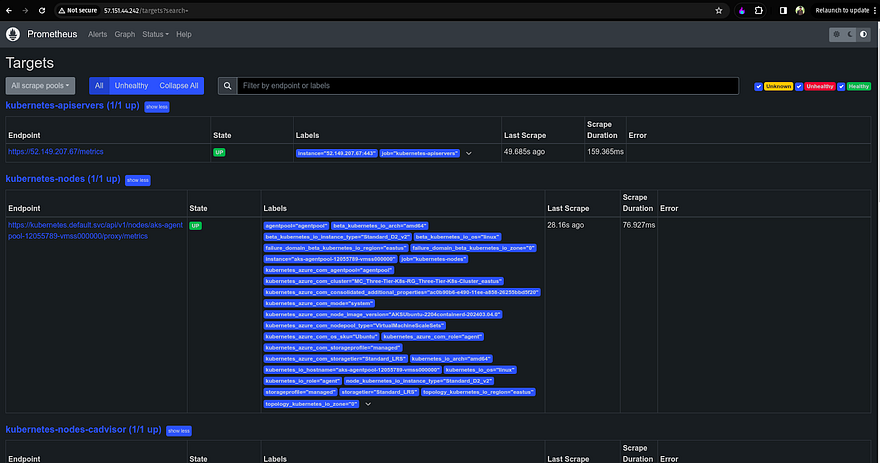
kubectl get svc -n prometheus

Copy the Public IP of Prometheus server and hit it on your favorite browser to access the Prometheus Server
Now, we will configure grafana to visualize the details of our Kubernetes Cluster
Create a dedicated namespace for it

Add the Prometheus helm repo and update the repo
helm repo add grafana https://grafana.github.io/helm-charts
helm repo update

Install the grafana helm chart
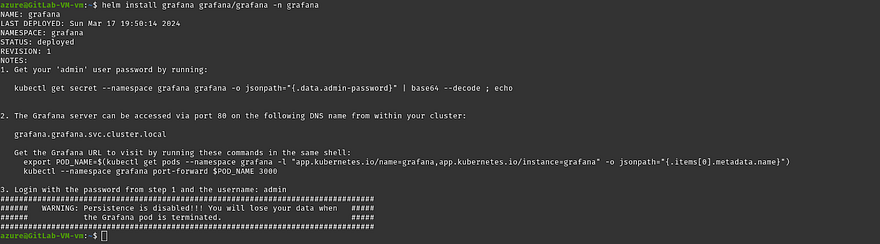
helm install grafana grafana/grafana -n grafana
Now, expose the Grafana server to the outside of the cluster
kubectl expose service grafana --type=LoadBalancer --target-port=3000 --name=grafana-ext -n grafana
Run the below command to get the external IP to access grafana
kubectl get svc -n grafana

To access the Grafana dashboard, you will need a username and password.
To get that run the below command to get the password and username will be the admin
kubectl get secret --namespace grafana grafana -o jsonpath="{.data.admin-password}" | base64 --decode ; echo

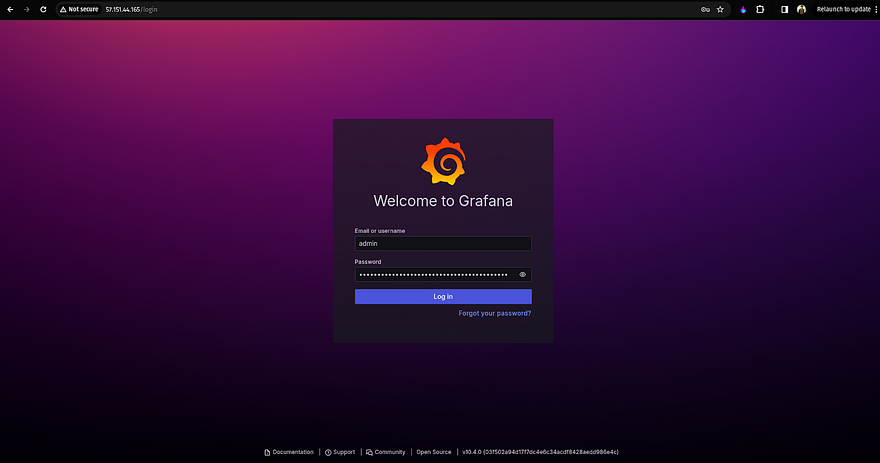
Copy the Public IP of the Grafana server and hit it on your favorite browser to access the Grafana server and provide the password that we received after running the previous command
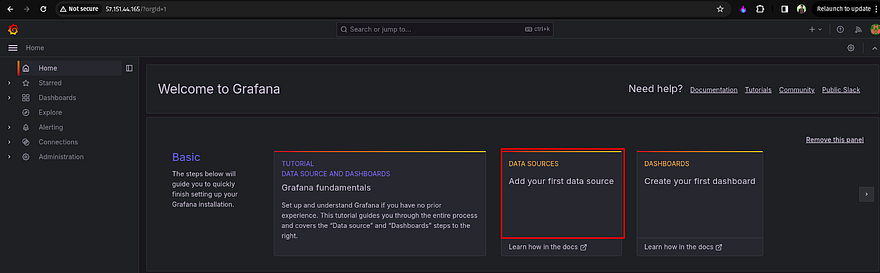
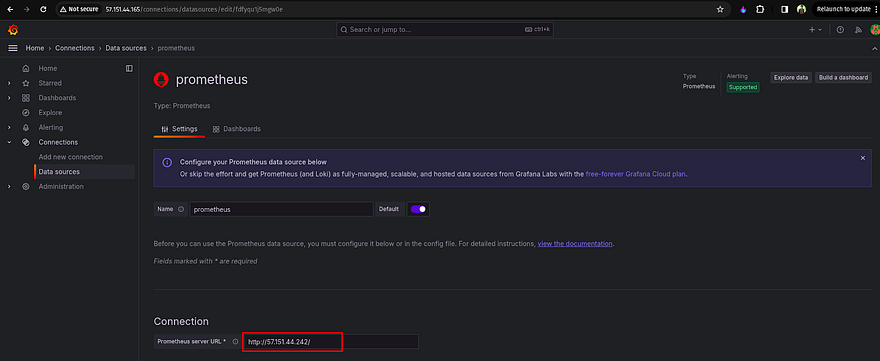
Once you log in, you need to add the Data Sources to monitor your Kubernetes Cluster
Click on Data Sources
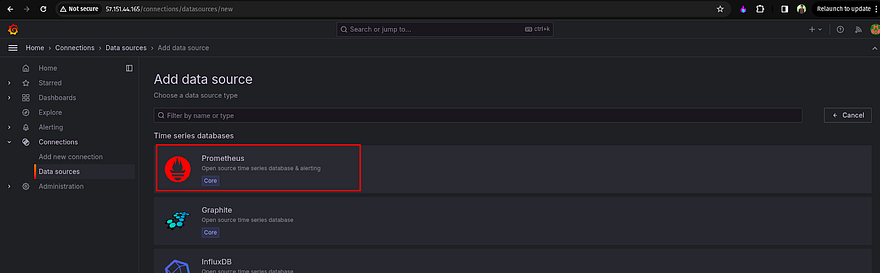
Click on Prometheus as a data source
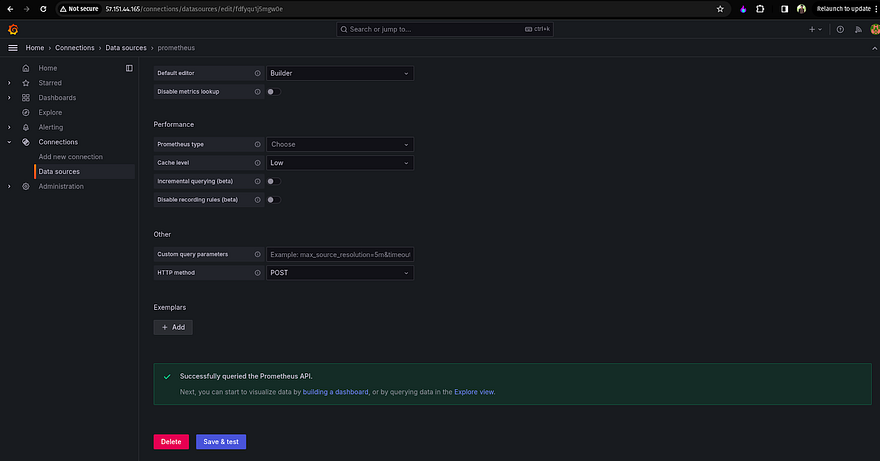
Provide the Prometheus server URL like the below snippet and click on Save & test
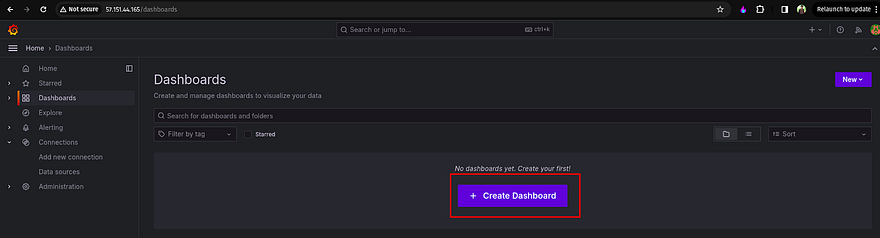
Now, click on Dashboard which is showing on the left
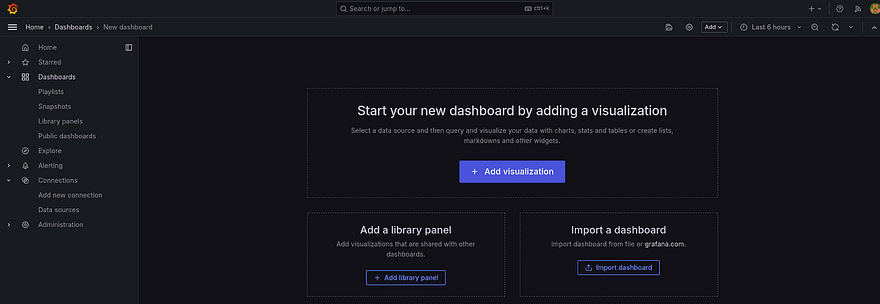
Click on Create Dashboard to create a custom dashboard
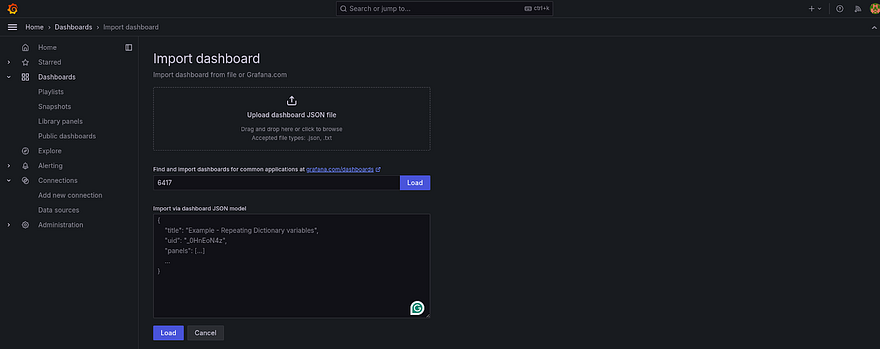
Click on the Import dashboard
Provide 6417 ID to import dashboard.
6417 is the unique ID that has Kubernetes data to visualize it on the Grafana Dashboard
Click on Load
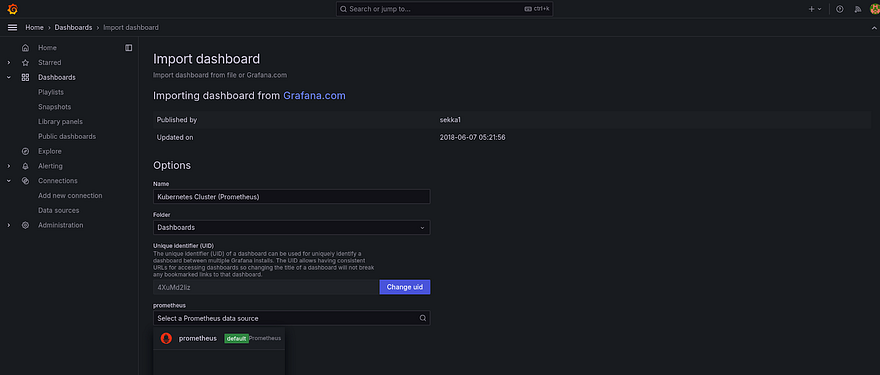
Once you land on the dashboard, select the data source as Prometheus that we configured in the earlier step and click on import
Here you can see the dashboard
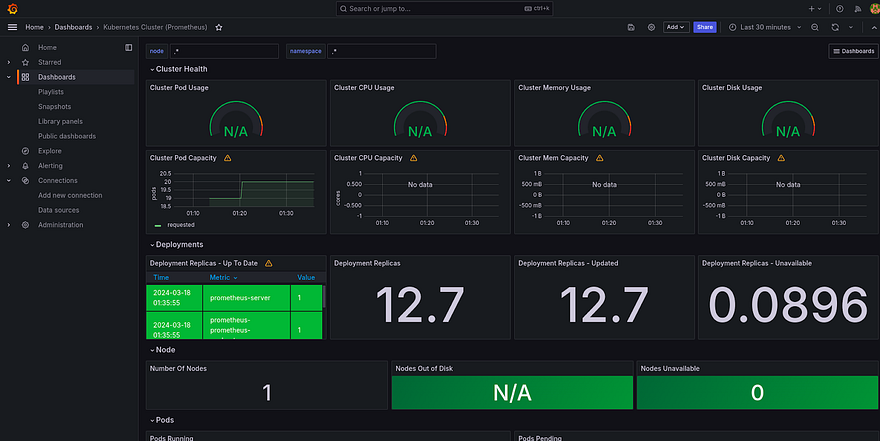
Monitoring is Done for now
Now, we will configure the SSL certificate for our application which will be deployed in the next 1 hour
Run the below command to label ingress-basic validation=true
kubectl label namespace ingress-basic cert-manager.io/disable-validation=true

Add the cert manager helm repo and update the repo

We need some Custom Resource Definitions to configure SSL for our application
Run the below command
kubectl apply -f https://github.com/cert-manager/cert-manager/releases/download/v1.7.1/cert-manager.crds.yaml

Install the cert manager helm chart
helm install cert-manager jetstack/cert-manager \
  --namespace ingress-basic \
  --version v1.7.1
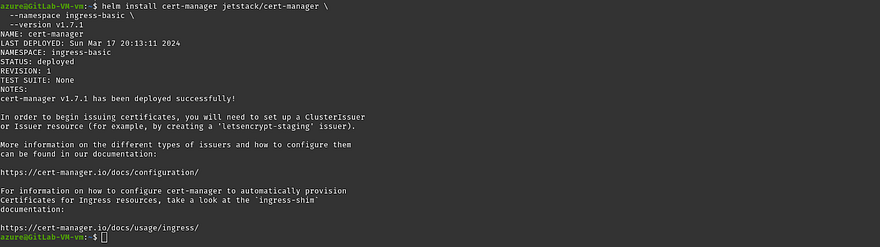
Validate whether cert-manager pods are running or not
There are two more things we need to implement SSL
The first one is cluster issuer where we will deploy SSL configurations
The second is to add annotations and tls config in the ingress file
This will be done automatically using fluxCD where fluxCD will deploy these both files itself.
Finally, we are going towards our Source Code deployment as we have configured for Terraform
Now, we need to build our Image of our Source Code which is frontend and backend
But Before going there, we need to create projects on our GitLab
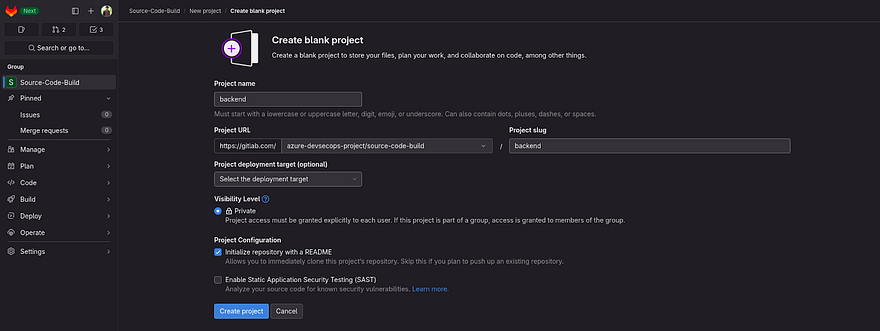
Go to Source-Code-Build Sub-group

Click on Create New Project

Provide the name to your repository as we need to create two repository frontend and backend
Click on Create project
Now, create one more repository for frontend and in the end, it should look like the below snippet inside the Source-Code-Build subgroup

We are going to start work on the backend repository first and it will be 90 percent the same as compared to the frontend. So, take a chill pill
Clone the backend repository in your VS Code
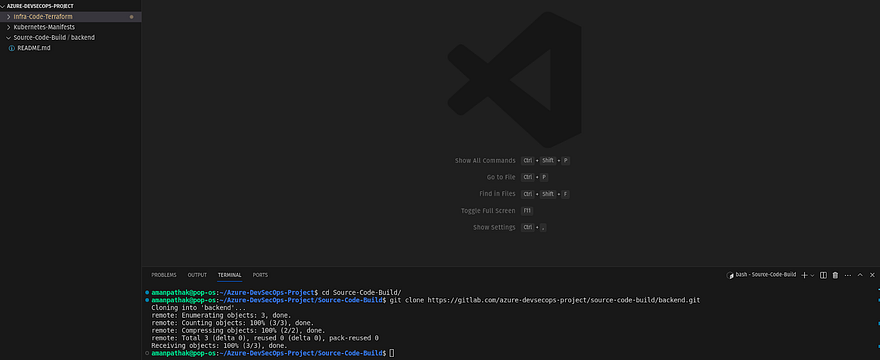
I have added the code for the backend along with Dockerfile and gitlab-ci.yml
Kindly go through at least the Dockerfile and gitlab-ci.yml file

Before going to push our code to repo, we need to set up the Sonarqube
So, If you go to Azure Gitlab VM, run the ‘docker ps’ command and you will be able to see one container is running which is sonarqube
This thing we have done while we creating Gitlab VM using Terraform
Note*: Refer to the [tools-install.sh](tools-install.sh) file for validation purposes*

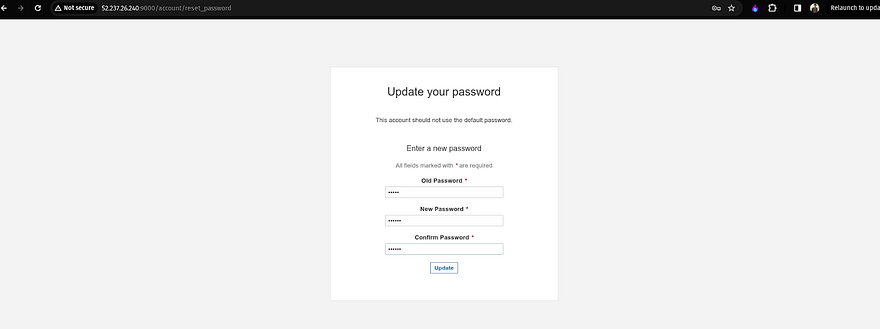
Copy the Public IP of your Gitlab VM and paste it on your favorite browser with Port 9000
The username and password will be admin

Regenerate the password
Now, we need to create a project for Code Analysis for our backend code
Click on manually
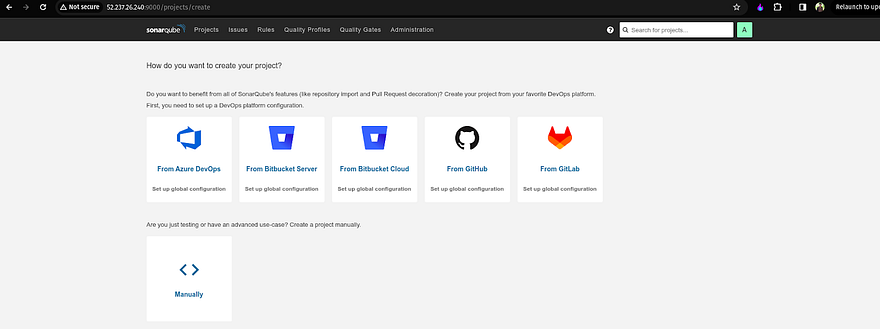
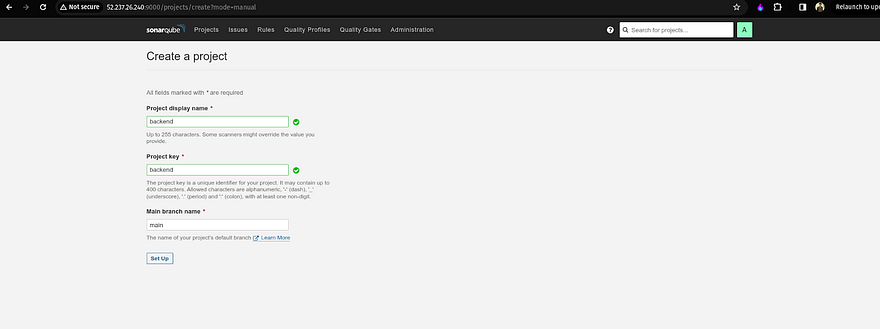
Provide the name of your project and click on Setup
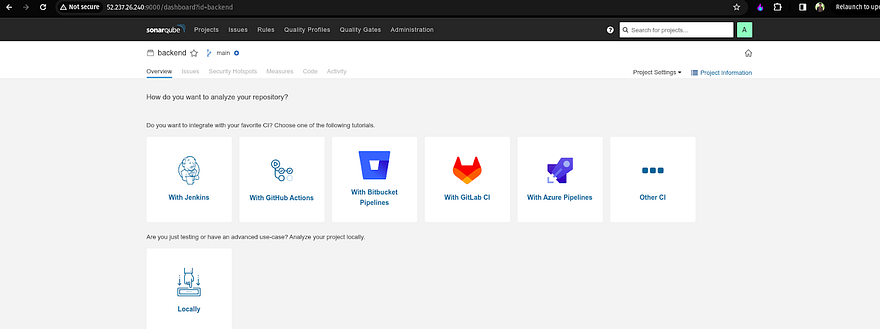
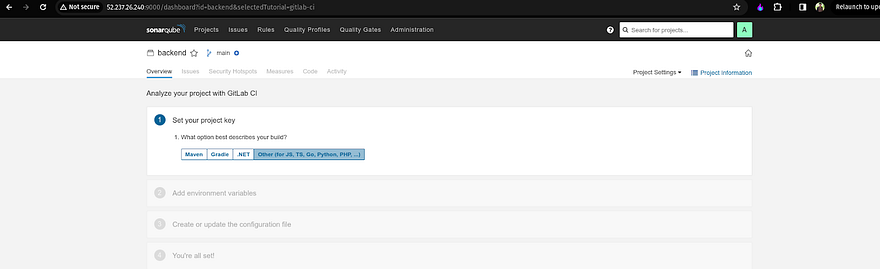
As we are using Gitlab, So click on With GitLab CI for analyzing the repository(backend)
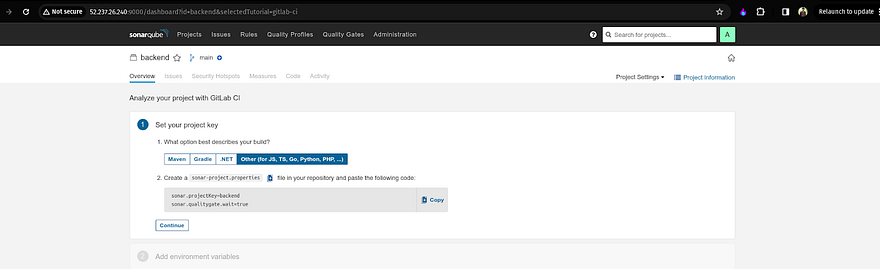
Select Other as the Project key
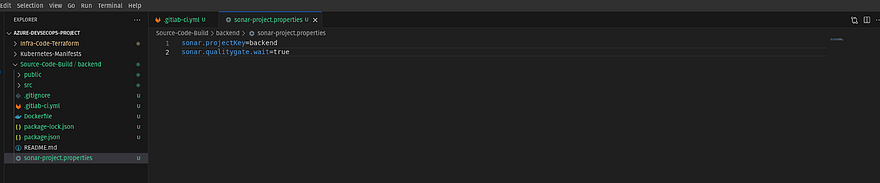
Now, you will get one instruction in which you need to create a file named sonar-project.properties and copy and paste the content where your backend code is located
I am adding the file and content from the VS Code
Go Back to your Sonarqube and click on Continue if you don’t
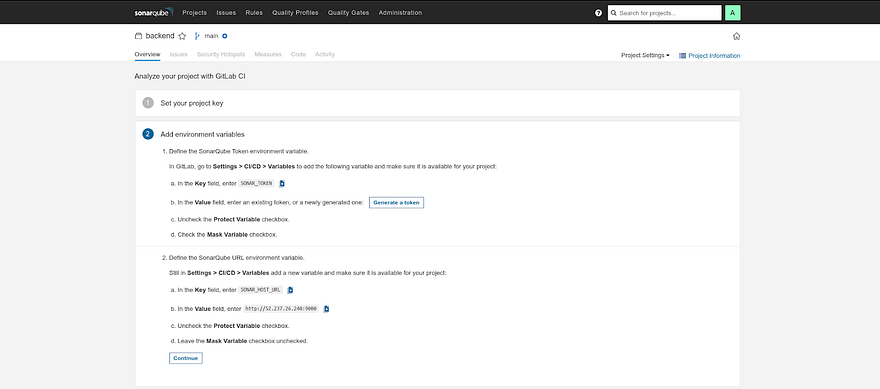
Now you need to generate the token and add it to your backend Gitlab repository
Click on Generate a token
Click on Generate
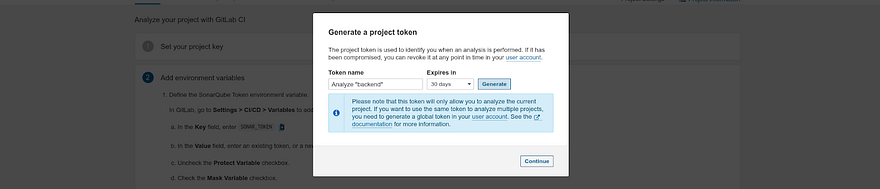
Copy the token and click on Continue
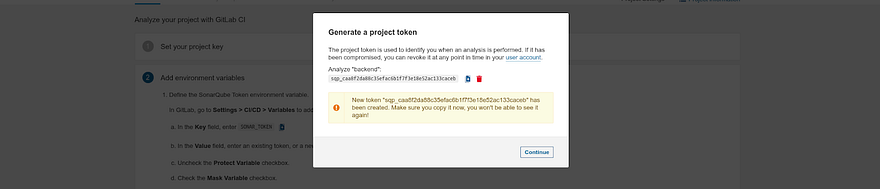
Now we need to add the token on our backend Gitlab repository
Keep the key name as it is
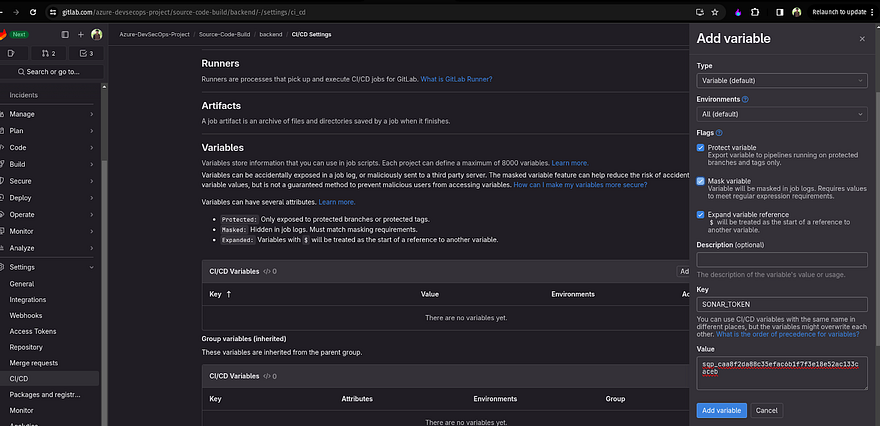
Now, we need to add a sonar host URL variable in our backend Gitlab repository
Go back to your sonarqube and copy the value provided by the sonarqube
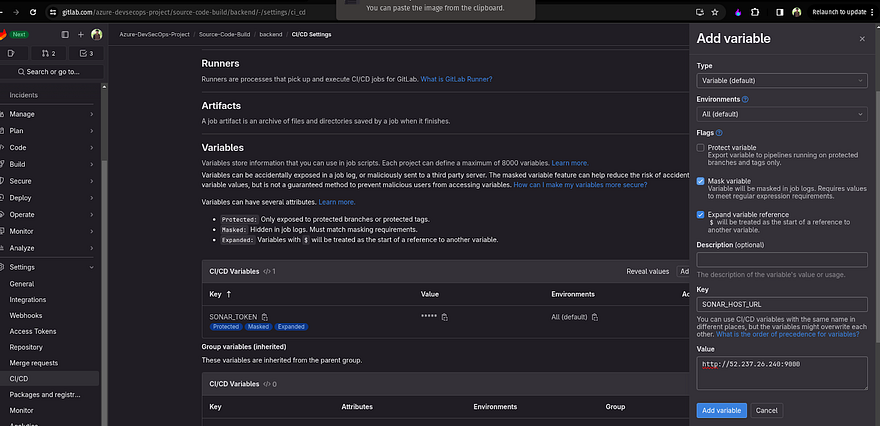
Now, Go back to your Sonarqube and click on Continue after adding both variables
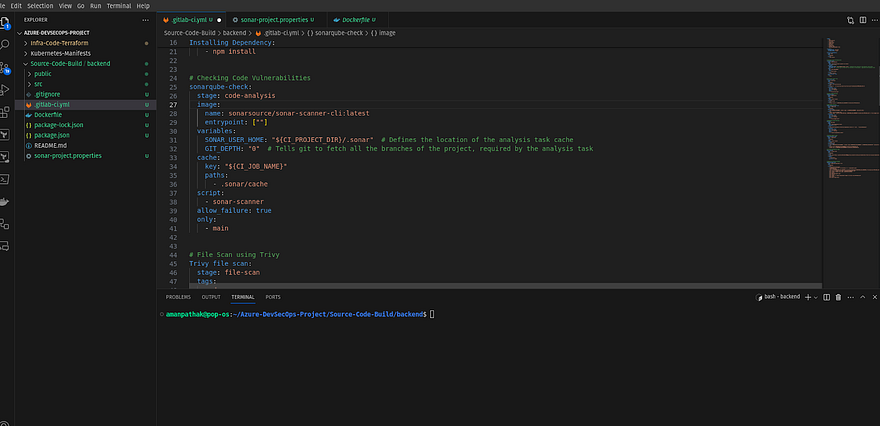
You will see a long file which is a code-analysis stage to add it to your .gitlab-ci.yml
This will perform the code analysis on your backend code
Copy the content

Paste it in your .gitlab-ci.yml
After the sonarqube-check line, stage you need to define yourself because that will be eliminated from the side of the sonarqube
So don’t forget to do that and for more reference, you can see my .gitlab-ci.yml file which looks into the third line of the script
Here, we completed the setup of Sonarqube for our backend code. The same thing we will be going to do for the front end as well. But that will happen once our backend pipeline completed
Now, we need to add some variables that are needed for our backend code repo
The first one is to add the Azure Container Registry credentials because once our docker image completed the build then, we will be going to push our docker image to Azure Private Container Registry
If you went through the code of azure-aks repo, you must have seen that we have created two Azure Container Registry named backend and frontend
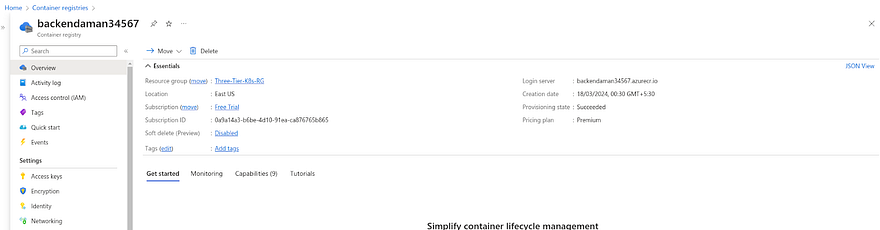
Go to your Azure Account and search for Container Registry then click on it

You can see the Azure Container Registries are present

Go to your backend registry
Now, we need to generate the Access keys for our backend registry because we are working on Private ACR
Click on the Access keys showing in the left pane
Click on the checkbox of Admin user

Once you fill the checkbox, you can see the password for our ACRs
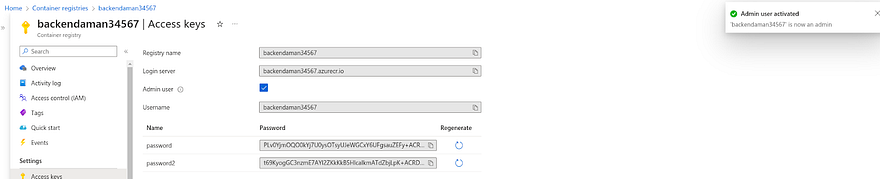
Now, we need to take three values for our GitLab repo variables which are username, login server, and password(any password will work)
So, copy the given values for each variable name and paste it into your GitLab backend repo’s variable section
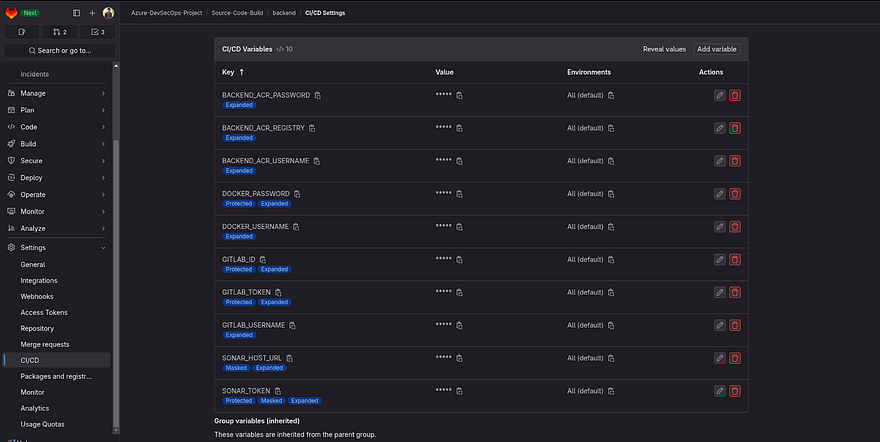
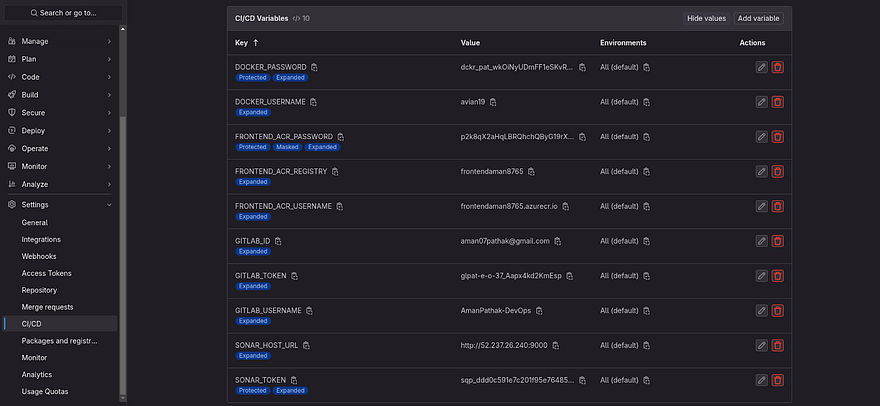
Note: Keep all the key names as it is if you are not going to change anything in your .gitlab-ci.yml file. Refer to the below image and take a look at each key and value for CICD variables
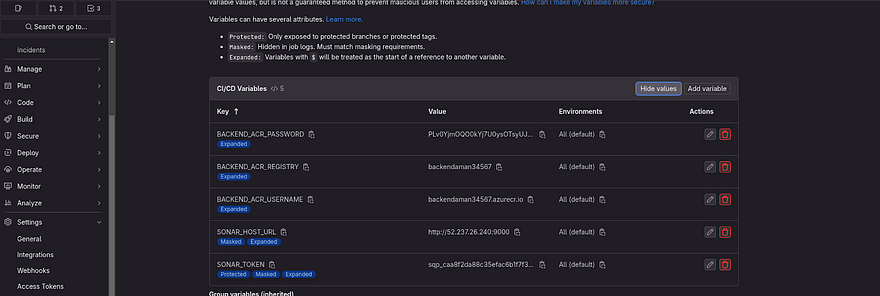
Now, we need to add docker username and password(PAT) CICD variables in our Gitlab backend repo
For Password, we need to generate PAT and I am hoping that you have an account on Dockerhub. If not, please create it
Login to your Dockerhub account click on your Profile then click on My Account
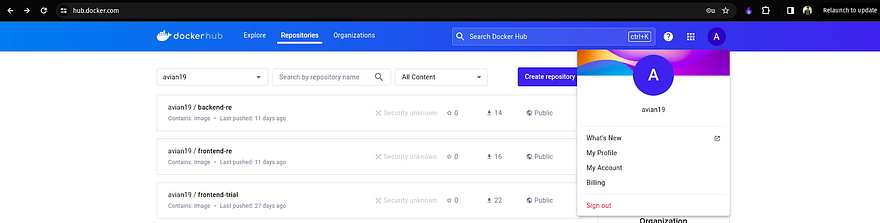
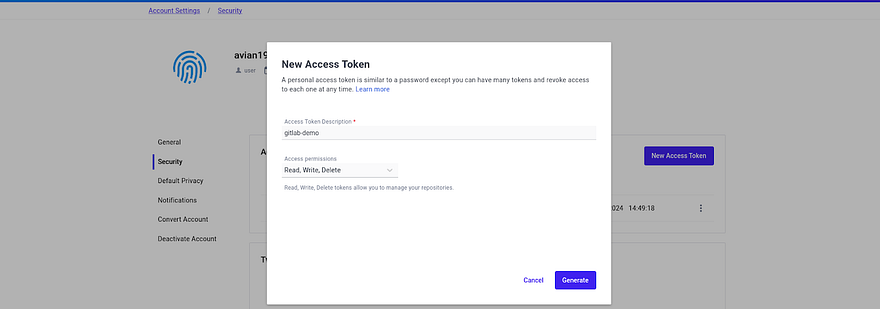
I have already generated the token, you can generate it by clicking on New Access Token

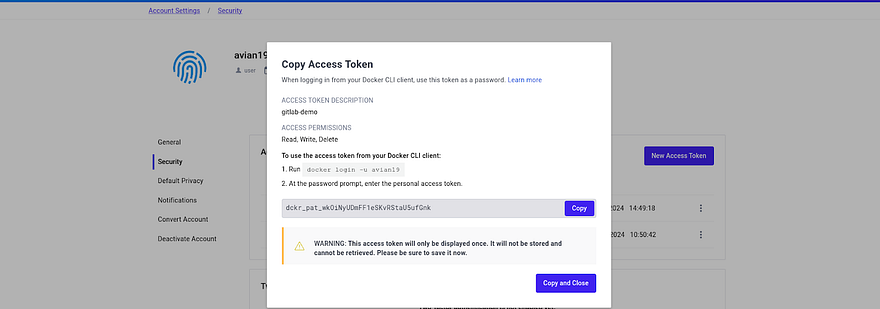
Describe your Access Token and click on Generate.
Then, you will get the token.
Copy the token and paste it which we are going to do in the next step
Now, we have added some other CICD variables which are Docker username, password, and Gitlab token(We have already generated in the first few steps of this blog).
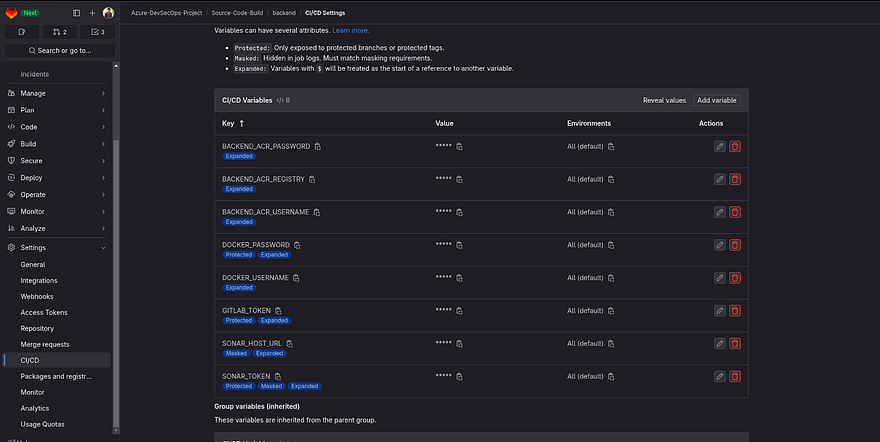
Now, we need to add two more variables which are GITLAB_ID(your mail ID which is registered to your gitlab) and GITLAB_USERNAME
Once you added the variables, the final snippet can be seen below
Note*: Kindly add all variables as shown in the below screenshot*
Now, before going to push our code to the repo. We need to configure that our backend code should be built on the Gitlab VM
To do that, Go to CICD and navigate to the Runners section in Gitlab Backend Repo
Click on three dots
Click on Show runner installation and registration instructions
We have already installed the run on our Gitlab. Now, we need only the gitlab repo token to integrate it with the Gitlab VM
Copy the below command
Run the copied command on your GitLab VM
It will ask you some questions, so while it will ask for tags then provide backend as tag, and when it asks for Enter an executor, provide a shell for now
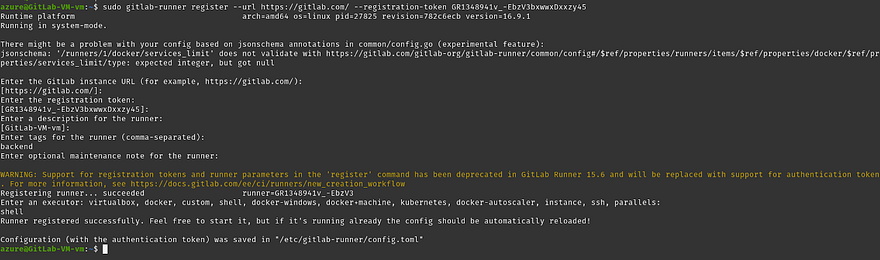
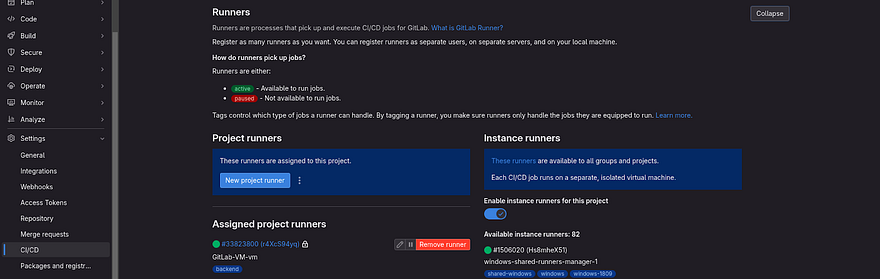
Once, you followed the above steps. Go back to your Gitlab backend repo’s Runner section
You will see your Runner comes in Green Signal which means you can run your Pipeline on this runner
Note: If your runner is in stop status, wait for two to three minutes and still the runner is not coming in the green state then start the gitlab runner by using the command ‘sudo gitlab-runner start’
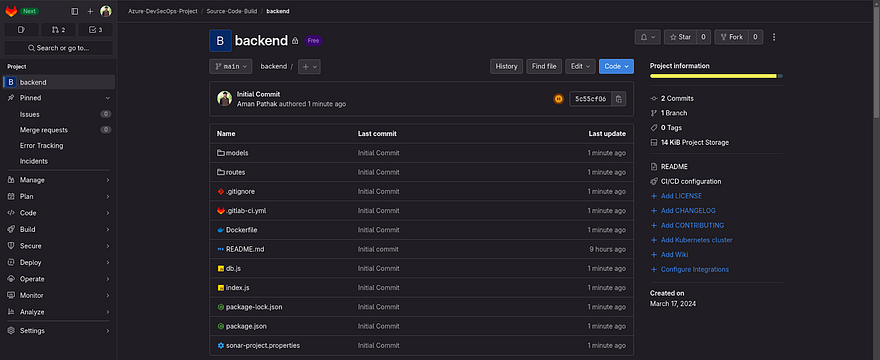
Now, we are ready to push our backend code to GitLab repo
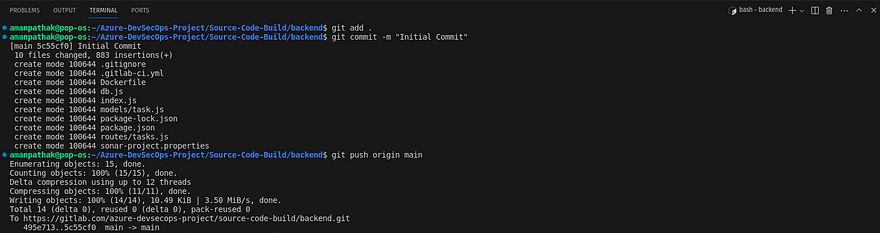
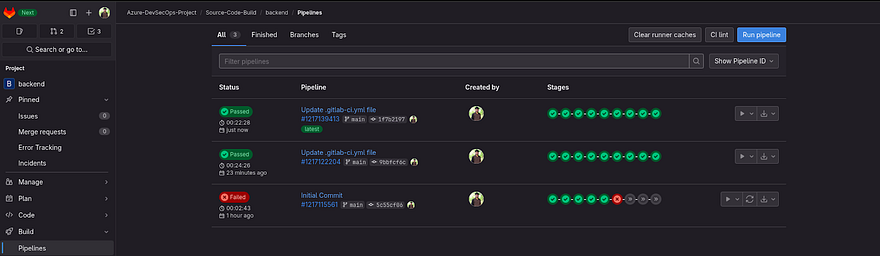
Code is Pushed and the Pipeline is started
We will get an error that the repository is not found because we have not created a manifest repository in the Kubernetes-Manifests subgroup.
Let’s do it now
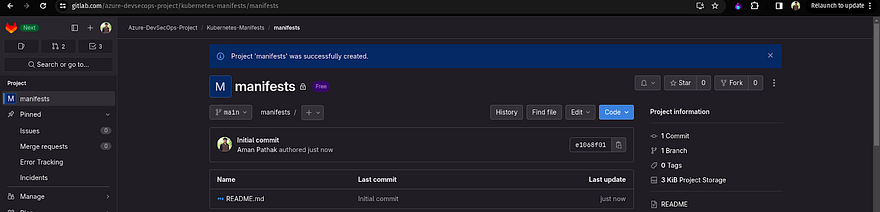
Go to your GitLab Group and click on Kubernetes-Manifests

The repository should look like this
Now, we need to push our manifests file to this repository
I have cloned the manifests repo and added all manifests file
Note: If you are new to Kubernetes. Don’t panic at least try to read some manifest because you will get a high overview of what we are going to do. One more thing, change the username and repository for frontend deployment and backend deployment because it will be different according to your ACR registry name and username.
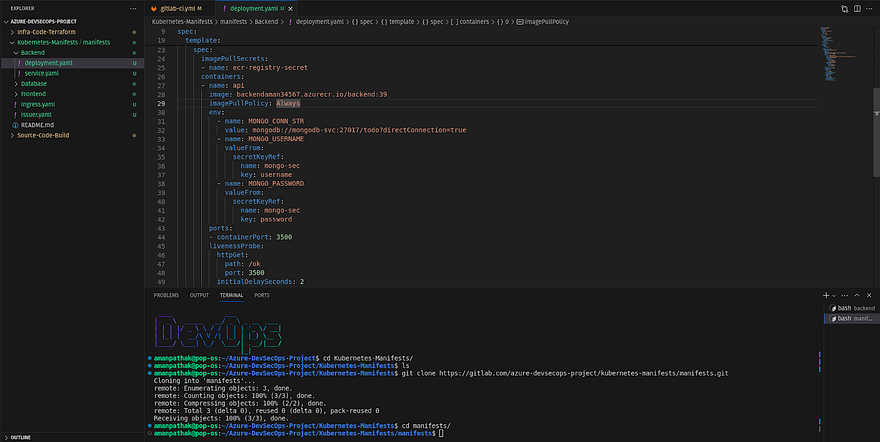
Now, I am pushing all the manifest files to the repository
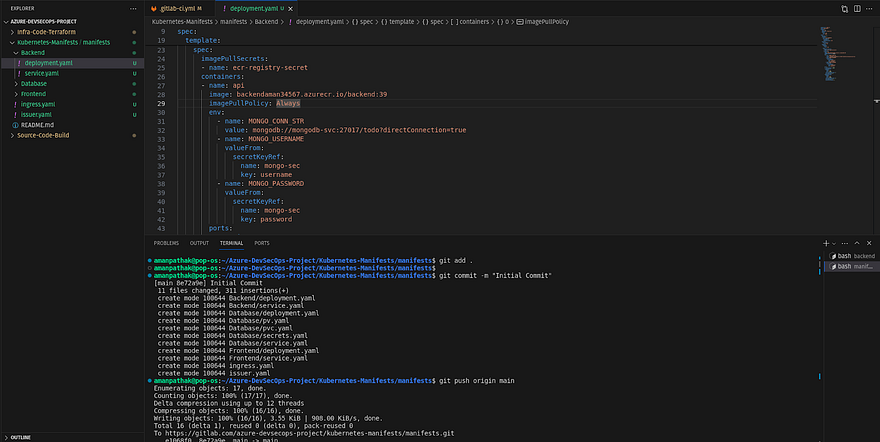
We are ready to run the pipeline but before going to do that, please check the docker image tag before running the pipeline because once the pipeline gets completed then you will see the tag will be changed
Now, run the pipeline again manually
Once, the pipeline reaches the last stage in the deployment file needs to be updated.
You need to run it manually because this will trigger the deployment of the manifest file(which will be implemented in the next 20 minutes)
So, click on Play
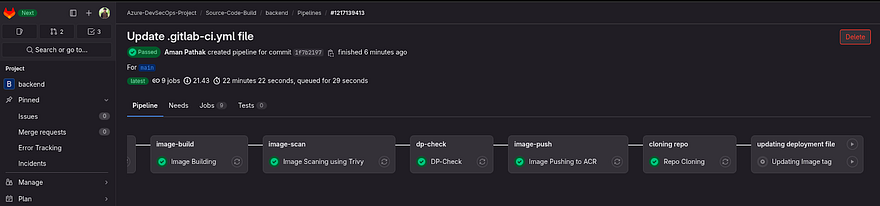
Pipeline is Successful
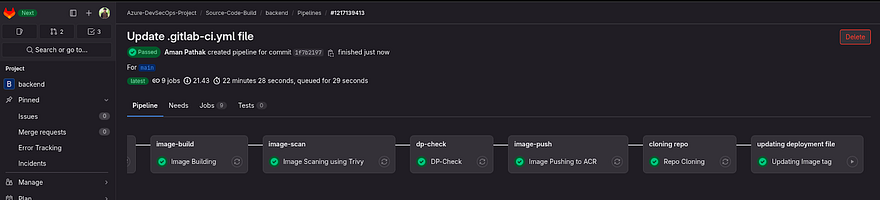
If you go to Pipeline, you will green mango and red mango which looks so cool, right?
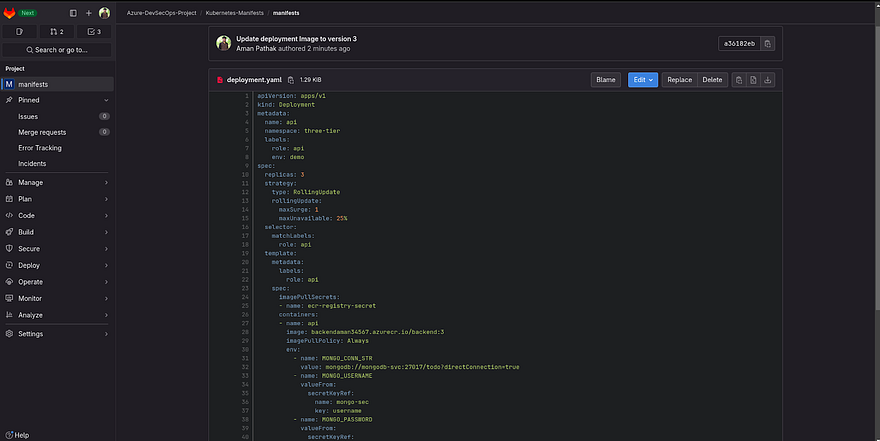
Now, Go to the manifest repo under the Kubernetes-Manifests sub-group and navigate to the Backend deployment file
You will see that the deployment file updated the image version to 3
If you go to Sonarqube, you will see that Sonarqube also completed the analysis of the code

Backend is completed and now It’s turn for Frontend.
Don’t worry it won’t be that much because 90 percent of steps are similar to the backend
So, Let’s do it
Clone the frontend repository in your VS Code

I have added the code for frontend along with Dockerfile and gitlab-ci.yml
Kindly go through at least the Dockerfile and gitlab-ci.yml file

Before going to push our frontend code to the repo, we need to set up the Sonarqube for the frontend
Go to Sonarqube and click on Projects

Click on Create Project and select Manually

Provide the Project name and click on Setup

Select Gitlab CI

Select the Project key as Other

Create the file in your frontend repository which is shown below in the snippet and copy and paste the content in the given file as well

You refer to the below snippet

Generate the token and paste them in the frontend repository CICD variable’s section as we did for the backend and do the same thing with the host URL as well

Click on Generate to generate the token

Copy the token keep it safe somewhere and click on continue

After adding both variables, it should look like the below snippet

Copy the content for the gitlab-ci.yml file and paste it into your .gitlab-ci.yml file

You can refer to the below snippet

We have completed the setup for our frontend Sonarqube Project

Now, we need some more variables as per our requirements
Generate the credentials for Azure ACR frontend registry

Fill in the Admin user Checkmark to generate the username and password for ACR

Then, add the variables according to the below snippet

We need to add other credentials as well in our frontend repository CICD variable’s section such as Gitlab token, Gitlab mail ID, Gitlab username, Docker username, and Docker password
Refer to the below snippet
Now, I want my front-end code to be built on a Gitlab VM.
To do that, I need to register my frontend repository with Gitlab VM
Click on Show runner installations and registration instructions

Copy the last command to register

Paste the command and provide frontend in tags and shell in the executor

After some minutes, you can go to the Frontend repository in the Runners section.
You will be able to see your runner is ready to run your pipeline

Now, push the frontend code to the repository

The Pipeline will automatically start as you can see in the below snippet. Our Pipeline was completed successfully.

Green Mangoes

You can validate your pipeline by going to the manifests repository and in that, the Frontend folder has deployment which should be updated.
If it’s not then, there is something suspicious with your steps

Now, you can see your Code smells and vulnerabilities in your frontend Sonarqube Project

Now, we need to set up fluxCD to deploy our application without any human intervention
Install fluxCD on Gitlab VM
curl -s https://fluxcd.io/install.sh | sudo bash

Validate whether fluxCD is installed or not
flux --help

Check whether the prerequisites for fluxCD are present or not
flux check --pre

Now, export the gitlab token
export GITLAB_TOKEN=<PAT>

Now, If you don’t know how fluxCD works. I’ll just give you a high overview
As you know, whenever there are any new changes made to any manifest file. It will be automatically deployed by fluxCD.
Now, The important thing is how fluxCD will get to know that there is any update in the manifest file.
For that, flux created a repository in your Gitlab which will continuously monitor the target repository where your manifest files are located. It is called bootstrapping.
Now, we will be going to Bootstrap which will create a repository. I can choose in which Project, the fluxCD repository will be created by specifying the owner
flux bootstrap gitlab \
  --deploy-token-auth \
  --owner=azure-devsecops-project/kubernetes-manifests \ # Provide the Project and where do you want to create the fluxCD repository
  --repository=flux-config \ # This will create a repository in which flux will keep it’s configurations
  --branch=main \
  --path=clusters/my-cluster

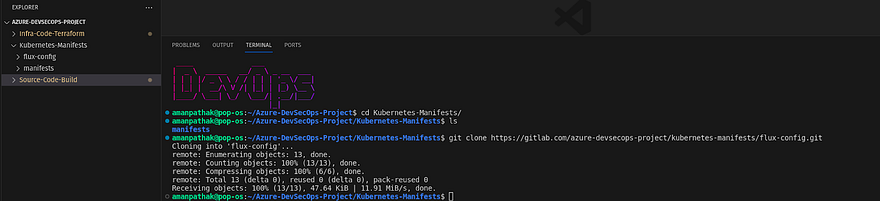
Go to Gitlab and Navigate to Azure-DevSecOps-Project group. Then, Go to the Kubernetes-Manifests subgroup. You will see one flux-config repository has been created fluxCD

Go to that repository and check the content

Now, we need to create a deployment token to access the repository where our Manifest files are stored
Go to Manifests repository and navigate to Settings-> Repository and provide the things showing in the below snippet

Copy the username and token

Create a secret by running the below command
flux create secret git flux-deploy-authentication \  --url=https://gitlab.com/end-to-end-azure-kubernetes-three-tier-project/kubernetes-manifests/manifests \
  --namespace=flux-system \
  --username=<USERNAME> \
  --password=<PASSWORD>

Validate the secrets by running the below command
kubectl -n flux-system get secrets flux-deploy-authentication -o yaml

Now, we need to provide some custom YAML files to deploy our Manifest file in the flux-config repository.
To do that, clone the flux-config repository in your VS code
Create a yaml file named source-manifest.yaml to sync with the manifest repo (This won’t apply to the manifest file) in the my-cluster path
Note*: In the URL section, you need to provide the repository link where your Manifests files are stored*

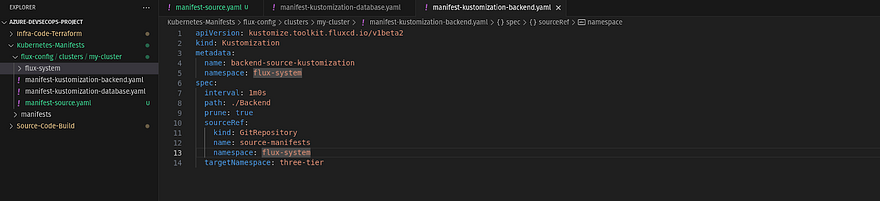
Now, we need to create the second yaml which is kustomization resource that informs flux to sync the manifest file deployment which is defined in the source-manifest yaml file
Note: I have three folders in my manifest file. FluxCD won’t be able to deploy all those manifest files in one go. For that, we need to create a kustomization resource for each folder and it’s good practice to avoid any confusion because the folders are dedicated to tiers such as Frontend, Database, and Application. Kindly go through all the files that we are going to create from here. Otherwise, you can get errors and that can take a lot of minutes
This is for database folder, we have some manifests file in Database folder which will deploy by fluxCD

Now, we will create kustomization resource for the Backend folder
We will create kustomization resource for the Frontend folder

Now, in the end, we have an ingress file that is not stored in any folder.
So, we will create one kustomization resource for it as well

Now, We need to push these changes to the Gitlab repo. But before that, go to your Kubernetes cluster and create a three-tier namespace by using the below command
kubectl create ns three-tier

Now, Push the changes to the Gitlab repo

Once you push the changes to the repo, fluxCD will automatically deploy your manifests file to the Kubernetes Cluster
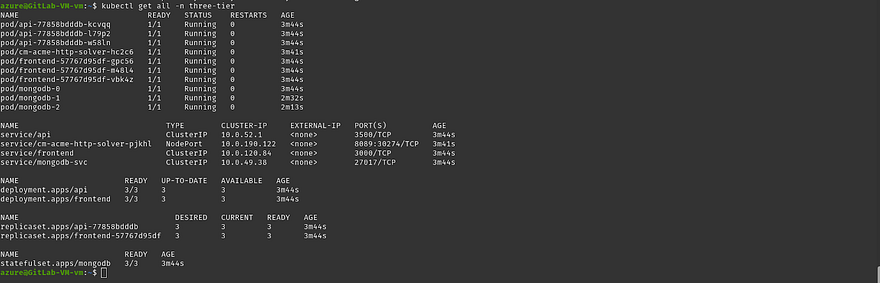
You can list all the objects that are created in the three-tier namespace by running the below command
kubectl get all -n three-tier
Ingress won’t appear if you run the ‘get all’ command. You need to write the below command to get ingress
kubectl get ing -n three-tier
The above command will show you the address for ingress which you need to add in your domain provider to correspondent to your hosts

This is my domain provider, I have added the public IP given by Ingress in the same hosts that are written in the Ingress file.

Hit the hostname from your favorite browser and
Congratulations You have successfully deployed the application on Azure AKS using GitLab DevSecOps Pipeline and fluxCD

Now, Just Re-run the both pipelines again(backend & frontend). We are expecting the new image will be pushed to the ACR which updates in the deployment file as well. Then, fluxCD will get the update and deploy the updated deployment file
We have also implemented manual image updation which the last stage won’t run automatically. To run it, you need to give permission(click on the Play button)

You can go to Grafana Dashboard and see the number of pods running and other stuff like CPU usage, etc.

If you have implemented this project till the end then, Congratulations. It means you have completed this Project
CleanUp
Once you completed the deployment and all the other things. Don’t forget to clean up the resources
Follow the below steps to clean the resources
You need to run the pipeline of azure-aks which will delete the AKS Cluster. Once you run the pipeline, you need to provide the value of the TERRAFORM_ACTION variable which will be destroyed. This will destroy your AKS Cluster. But if you get an error in your plan stage like an invalid role ID and secret ID. Then, log in to the hashicorp vault server. Delete the previous app role and regenerate the role ID and secret ID as we did earlier. Then, you need to update your AKS repository variables in which VAULT_ROLE_ID and VAULT_SECRET_ID values you need to change. Now, run the pipeline again and this will destroy the AKS without getting any error.
Now, you need to destroy the hashicorp vault server. To do that, go to your hashicorp vault repository and run the pipeline along with the variable TERRAFORM_ACTION value destroy. This will destroy the hashicorp VM.
After that, you need to destroy the Gitlab VM. To do that, go to the gitlab-vm repository and run the pipeline along with the variable TERRAFORM_ACTION value destroy. This will destroy your gitlab-vm as well
All the things were cleaned up. But if you are going to write a blog and you are going to post on public forums. Then, delete all the Personal Access tokens such as Docker PAT, Gitlab PAT, and other confidential information
Conclusion
In conclusion, the integration of Terraform, HashiCorp Vault, and GitLab CI/CD pipelines provides a powerful framework for automating and managing cloud infrastructure deployments on Azure. By following the outlined steps and best practices, organizations can establish a scalable, secure, and efficient DevOps workflow. Empowered with the ability to provision infrastructure as code and manage secrets securely, teams can accelerate their development cycles, improve collaboration, and deliver reliable applications with confidence in the cloud-native era.
Stay connected on LinkedIn: LinkedIn Profile
Stay up-to-date with GitHub: GitHub Profile
Feel free to reach out to me, if you have any other queries.
Happy Learning!