

Building Intelligent Image Recognition Systems with AWS Lambda, S3, Rekognition, and SNS: A…


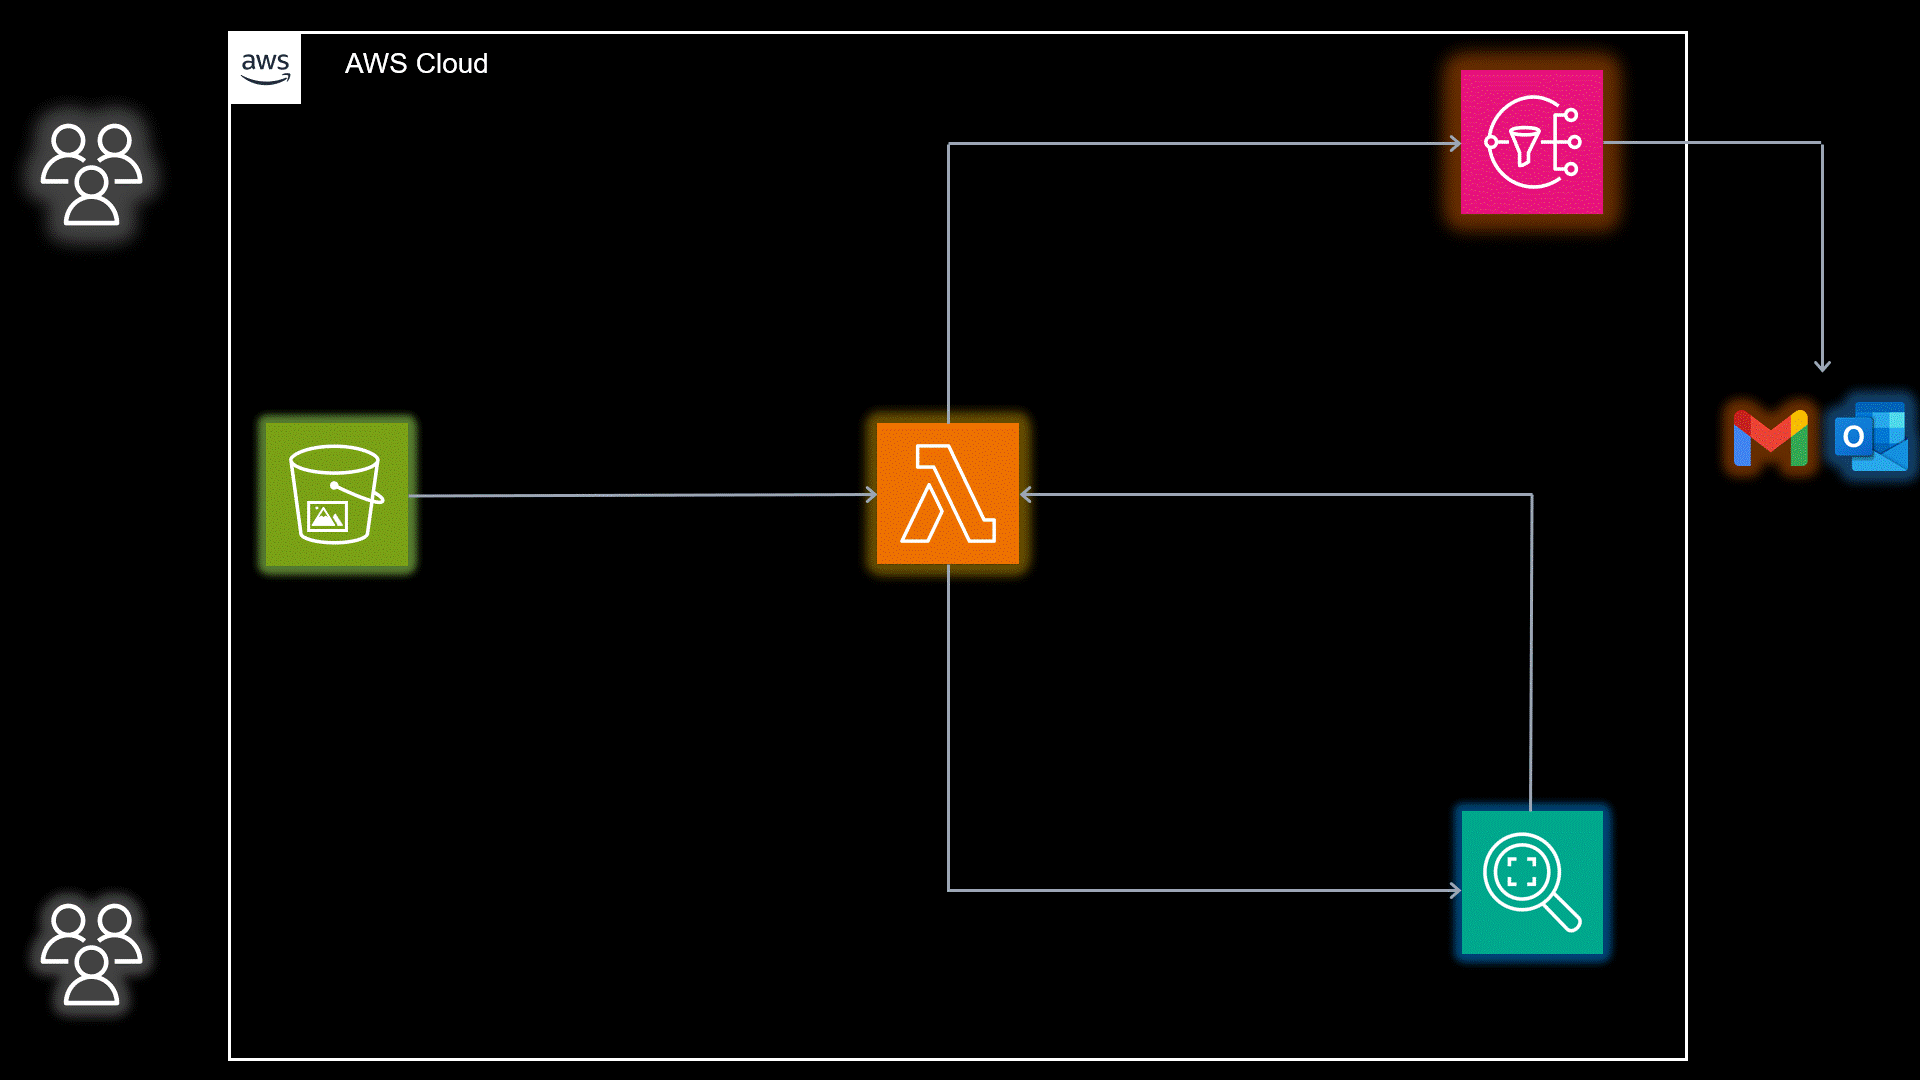
AWS Infrastructure Diagram
Introduction
Image recognition technology has become increasingly vital across industries, enabling automated analysis of visual content. In this blog post, we will explore how to build intelligent image recognition systems using AWS services. By leveraging AWS Lambda, S3, Rekognition, and SNS, you can develop powerful solutions that automate visual insights. Let’s dive into the step-by-step guide to implementing this exciting technology.
Problem Statement
Imagine the need to analyze a large collection of images or videos to detect objects, identify faces, or moderate content. Manually processing such visual data is time-consuming, error-prone, and inefficient. This is where automated image recognition systems come into play. By harnessing the power of AWS services, you can create solutions that perform complex visual analysis with ease, saving time and enhancing accuracy.
Prerequisites
To implement the image recognition project, you’ll need the following prerequisites:
- An AWS account: Sign up for an AWS account if you haven’t already.
- Basic knowledge of AWS services: Familiarize yourself with AWS Lambda, S3, Rekognition, and SNS.
- Programming concepts: Understand the basics of programming and how to work with APIs and SDKs.
About the Approaches
In this project, we will explore two approaches: a deployment using Terraform and a manual implementation.
Terraform Approach
For a more streamlined and automated deployment, you can utilize Terraform, an infrastructure-as-code tool. The project repository on GitHub contains the necessary Terraform code. Follow these steps to implement the solution using Terraform:
- Clone the Repository: Clone the GitHub repository to your local environment.
- Set up AWS Credentials: Configure your AWS credentials to allow Terraform to access your AWS account.
- Customize the Terraform Configuration: Modify the Terraform variables in the code to match your AWS environment and project requirements.
- Deploy the Infrastructure: Run the Terraform commands (
terraform init,terraform plan,terraform apply) to deploy the AWS resources automatically. - Monitor and Manage: Utilize Terraform to monitor and manage your infrastructure, easily make modifications, and maintain consistency.
Manual Approach: In situations where you prefer a more hands-on approach or need to customize the implementation further, the manual approach can be followed. The steps for the manual implementation are as follows:
- Create a bucket that will be stored and compared with the other images.

2. Name the bucket name

3. Click on Create topic to create an SNS topic.

4. Topic type must be Standard and give the name to SNS topic.

5. Click on Create a subscription

6. Give the TopicARN that we have created above and the protocol should be Email type and enter your email and click on Create a subscription.

7. After creating a subscription, you will get an email to the given mail id. Click on the highlighted link to confirm the subscription.

8. Once you confirm the subscription. The status will be confirmed as per the below screenshot.

9. Click on Create a function.

10. Fill in the details, according to the below screenshot.
And replace the default code with the given code in the repository
Python-Code-for-Amazon-Rekognition

11. Add the permission to the lambda function, S3FullAccess needs to read the files, AmazonRekognitionFullAccess needs to compare the files, and SNSFullAccess needs to send an email to the respective person.

12. We have to give the BUCKET_NAME and SNS_TOPIC_ARN in the python code. But as it is not one of the DevOps best practices. We will use lambda environment variables to define the values of both(BUCKET_NAME and SNS_TOPIC_ARN) and click on Save.

13. Now, As part of the Automation, Whenever the user pushes the image to the bucket. Then, the lambda function will run and compare the pushed images with the other stored images.
To Add the trigger, click on +Add trigger.

14. Add the bucket name that we have created in the first step and click on Add.

15. Now, As you can see in the below screenshot, the S3 trigger has been added.
Note: Increase the lambda timeout from 3sec to 10sec.

Now, I have pushed the image over the created S3 bucket and after that, I will get these kinds of emails.
This is our Goal which we have completed.
Conclusion: Building intelligent image recognition systems using AWS services empowers you to automate visual analysis and gain valuable insights from visual data. In this blog post, we explored the step-by-step process of implementing image recognition through both manual and Terraform approaches. By leveraging AWS Lambda, S3, Rekognition, and SNS, you can create robust solutions that enhance productivity and accuracy. Start building your own image recognition systems and unlock the potential of visual data today.
Thanks and Follow: Thank you for reading this blog post. I hope you found it informative and inspiring. If you have any questions or feedback, feel free to reach out. Stay connected for more exciting content and updates on AWS solutions for image recognition. Follow on LinkedIn to stay up to date with the latest developments.
GitHub Profile: https://github.com/AmanPathak-DevOps
Happy Learning!
Aman Pathak