


Introduction
Welcome to Day 22 of our Kubernetes journey! Today, we delve into a crucial concept: “Stateful Applications.” These are the backbone of data-intensive and mission-critical services. Let’s explore what they are and how they differ from their stateless counterparts.
What are the Stateful applications?
Stateful applications are those applications that contain the previous states or data of the applications. If the applications, restart or move to other environments then, the data and the state of the applications still exist.
Examples of Stateful applications includes PostgreSQL, MySQL, messages queues. These applications ensures that the data, application reliability, and state of the applications will be taken care of by the StatefulSets Object in Kubernetes.
Difference between Stateful and Stateless applications.
Let’s understand the Stateful and Stateless applications with real-time examples.
Stateful applications
- “Remember when we used to play GTA Vice City during our teen years? Completing that game required hours because we were in school at the time.”
- “Once I completed a mission, I saved the game. So, whenever I wanted to continue, I just went to the save game section and resumed from where I left off.”
- “At that moment, we didn’t think about how it worked, but now we understand that there were sessions that helped us save the game data, which was stored in our root folder.”
Stateless applications
- “If you used old keypad mobiles, you might have used a calculator application.”
- “Your father asked you to perform operations like addition and subtraction.”
- “By mistake, you tapped the red button, which took you back to the home screen.”
- “Now, you can’t retrieve the numbers you were entering. This means there is no session involved.”
StatefulSets VS Deployment
Kubernetes has rich features like StatefulSets and deployment. But Statefulsets eliminates the previous states and data stored problems.
Let’s understand both.
StatefulSets
- Identity and Stable Network hostnames: StatefulSets are used for those applications that require stable network identity and hostnames. Whenever the pod is created, it gets a unique name, an ordinal index appended to its name. For example, the pod name looks like web-1, web-2, web-3, and so on.
- Order deployment and Scaling: StatefulSets deploy the pods in sequential order. If you observe in deployment, the multiple pods in replicas are created at one time. But In StatefulSets, each pod will be created once the previous pod is created. If pods are deleted, the newest created pod will be deleted first which means, that to delete the pod StatefulSets follows the reverse order.
- Data Persistence: StatefulSets are used for those applications that require data persistence such as databases. StatefulSets allow to attachment and mount of the permanent volumes to the disk. So, if any pod is rescheduled or restarted it will have the all data.
- Headless Services: StatefulSets have one more rich feature which is Headless Services. StatefulSets can be associated with the headless services that provide the DNS for each pod’s hostnames. This will help to communicate with the specific pods.
Deployment
- Scalability and Rolling updates: Deployments are often used for stateless applications. Deployments provide the replicas and no downtime feature.
- No Stable Hostnames: Deployments do not provide the feature of stable hostnames which means, that if the pod is created then it will have a randomly generated name.
- No Data Persistence: As deployment objects are often used for stateless applications So, pods are stateless too which means it does not provide data persistence. Whenever a pod is replaced, the data will be lost of the previous pod.
- Load Balancing: Deployment works with Services objects which provides Load Balancing. It distributes the traffic between multiple pods to make the application highly available.
Key Features and Facts of StatefulSets:
- StatefulSets provides the Order pod creation which provides the unique name to each pod in a predictable order such as web-1, web-2, and so on.
- StatefulSets provides the Stable Network Identity which makes it easy to connect with the pods.
- StatefulSets provides the Data Persistence which stores the data in the databases and whenever the pod is restarted or rescheduled, the pods get the same persistent data.
- StatefulSets provides the PV and PVC to provide the persistent storage to StatefulSets pods.
- StatefulSets provides the Backup and Recovery features which are very crucial for maintaining data integrity with StatefulSets.
Hands-On
Open the two terminals
We have to see how the pods are created. To do that, run the below command on terminal1
kubectl get pods -w -l app=nginx

Create a service file and StatefulSet file copy the below content in the respective file and apply it.
service.yml
apiVersion: v1
kind: Service
metadata:
name: nginx
labels:
app: nginx
spec:
ports:
- port: 80
name: web
clusterIP: None
selector:
app: nginx
StatefulSets.yml
apiVersion: apps/v1
kind: StatefulSet
metadata:
name: web
spec:
serviceName: "nginx"
replicas: 2
selector:
matchLabels:
app: nginx
template:
metadata:
labels:
app: nginx
spec:
containers:
- name: nginx
image: registry.k8s.io/nginx-slim:0.8
ports:
- containerPort: 80
name: web
volumeMounts:
- name: www
mountPath: /usr/share/nginx/html
volumeClaimTemplates:
- metadata:
name: www
spec:
accessModes: [ "ReadWriteOnce" ]
resources:
requests:
storage: 1Gi

The Pods are creating sequential, observations in the first command output.
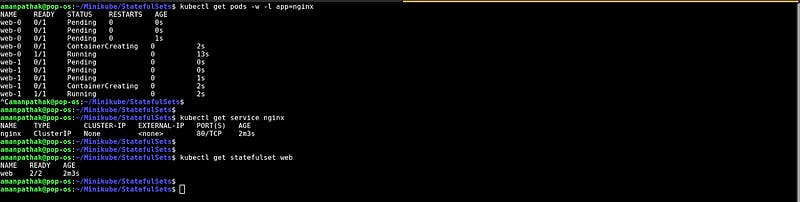
As we have created pods from statefulset, So the pod's names have sticky and unique names.

If you run the below command, you will see that both pods have stable hostnames on their ordinal index.
for i in 0 1; do kubectl exec “web-$i” — sh -c ‘hostname’; done

Now, I want to check the pod’s dns addresses. Run the below command
kubectl run -i — tty — image busybox:1.28 dns-test — restart=Never — rm

Once you enter the container, run the below command.
nslookup web-0.nginx
Now, you can check the dns address.

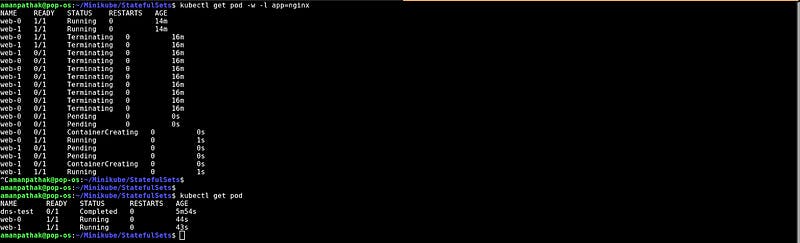
Open two terminals, run the below command on terminal1
kubectl get pod -w -l app=nginx
As you can see both pods are running.

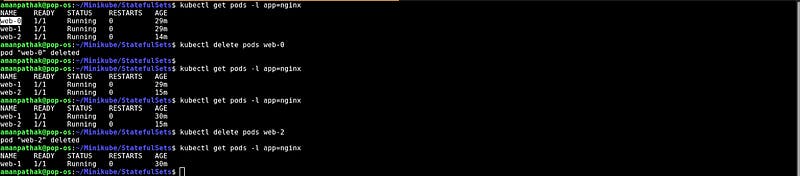
Now, run the below command to delete both pods on terminal 2.
kubectl delete pod -l app=nginx

As you know, we have set up the replicas=2. So, if we delete any pod it will create a new pod to meet with the desired state of the replicas.
But there is one more thing to notice here, that the pod is deleting sequentially.
If you run the last command, you will see that both pods have been created again.
If you run the below command, you will see the same hostnames that were present for previous delete pods.
for i in 0 1; do kubectl exec web-$i — sh -c ‘hostname’; done

Now, if you log in to the container. You will be able to see the same dns address but the IP might have changed.

Run the command to get a list of all the persistent volume claims that are attached to the app nginx.

As we have mounted our persistent volume to the path /usr/share/nginx/html in the Stateful.yml file. So, the path will be backed by the Persistent Volume.
Now, to check the hostnames of both pods run the below command.
for i in 0 1; do kubectl exec "web-$i" - sh -c 'echo "$(hostname)" > /usr/share/nginx/html/index.html'; done
for i in 0 1; do kubectl exec -i -t "web-$i" - curl localhost; done

Delete both pods
kubectl delete pod -l app=nginx

Validate the pods' deletion and creation on the other window
kubectl get pod -w -l app=nginx
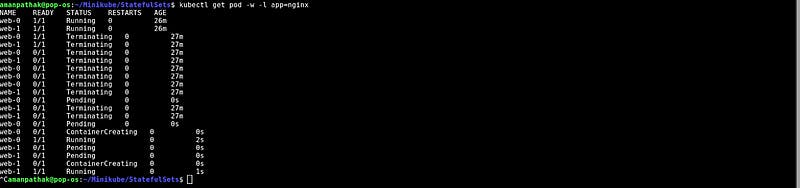
Now, validate the web servers whether the hostname is the same or not
for i in 0 1; do kubectl exec -i -t “web-$i” — curl localhost; done

Now, let’s scale up the StatefulSets. You can use the kubectl scale or kubectl patch to scale up or scale down the replicas.
kubectl scale sts web — replicas=5

If you see the persistent volume claim, it will be increased as pods are created.
kubectl get pvc -l app=nginx

Now, scale down the number of replicas through the kubectl patch
kubectl patch sts web -p ‘{“spec”:{“replicas”:3}}’

If you list the Persistent volume claims, you will see all 5 PVCs present. This is because StatefulSets assumes that you deleted the pods by mistake.

Now, to rollback use the below command
kubectl patch statefulset web -p ‘{“spec”:{“updateStrategy”:{“type”:”RollingUpdate”}}}’
The below command will change the image of the container.
kubectl patch statefulset web — type\=’json’ -p=’[{“op”: “replace”, “path”: “/spec/template/spec/containers/0/image”, “value”:”gcr.io/google_containers/nginx-slim:0.8"}]’

Use the below command to check the container image
for p in 0 1 2; do kubectl get pod “web-$p” — template ‘{{range $i, $c := .spec.containers}}{{$c.image}}{{end}}’; echo; done

If you want to delete StatefulSets then you have two options Non-Cascading deletion and Cascading deletion.
In Non Cascading deletion, the StatefulSet’s Pods are not deleted when StatefulSets is deleted.
In Cascading deletion, both the StatefulSet’s Pod and StatefulSets are deleted.
Non-Cascading deleted
Open the two terminals and run the below command on the first terminal.
kubectl get pods -w -l app=nginx

On the second terminal, this command will delete only StatefulSets only, not the StatefulSets pods.
kubectl delete statefulset web — cascade=orphan

If you go to the first terminal, you will see the pods still exist.

If you try to delete any pod, you will observe that the deleted pods are not relaunching.
Now, we have to perform the StatefulSets deletion through the Cascading method.
To do that, apply the both service and StatefulSets files.

If you see both pods are running

Check the hostname of both pods by running the below command
for i in 0 1; do kubectl exec -i -t “web-$i” — curl localhost; done

Cascading deleted
In this method, the StatefulSets will be deleted with StatefulSet’s Pod.
kubectl delete statefulset web

Conclusion
Today, we’ve uncovered the essence of stateful applications and their counterparts, stateless applications. We’ve explored the critical differences and how Kubernetes leverages StatefulSets to manage these stateful applications with care and precision.
As we continue our Kubernetes adventure, we’ll keep delving deeper into essential concepts and hands-on experiences. Stay tuned for more exciting learnings ahead!
Want to Know About Challenge?
If you’re eager to learn more and join our challenge through the GitHub Repository, stay tuned for the upcoming posts. Follow for more exciting insights into the world of Kubernetes!
GitHub Repository: https://github.com/AmanPathak-DevOps/30DaysOfKubernetes
#Kubernetes #IngressController #Ingress #ContainerOrchestration #DevOps #K8sLearning
See you on Day 22 as we unravel more Kubernetes mysteries!
Stay connected on LinkedIn: LinkedIn Profile
Stay up-to-date with GitHub: GitHub Profile
Feel free to reach out to me, if you have any other queries.
Happy Learning