


Introduction
Embark on a journey into the world of containerization as we delve into the deployment of a robust MERN stack application using Docker and Docker Compose. In this blog post, we will explore two distinct approaches — Dockerfile and Docker-Compose — each bringing its own set of advantages to the deployment process.
GitHub Repository (Dockerfile Implementation)- https://github.com/AmanPathak-DevOps/Docker-Projects/tree/master/Dockerfile-Project
GitHub Repository (Docker-Compose Implementation)- https://github.com/AmanPathak-DevOps/Docker-Projects/tree/master/DockerCompose-Project
To deploy our application, we will use two approaches.
Dockerfile: According to our project, Dockerfile will help me to create images and containers but the issue you will see is that I need to provide the network for each application to communicate with each other.
Docker-Compose: While doing deployment using Docker-Compose, it will create the default network in which the container will be created. So, you don’t need to configure the network manually.
There are many more differences between Dockerfile & Docker-Compose. But today’s blog is dedicated to Project only. So, we won’t do that.
Deploy using Dockerfile
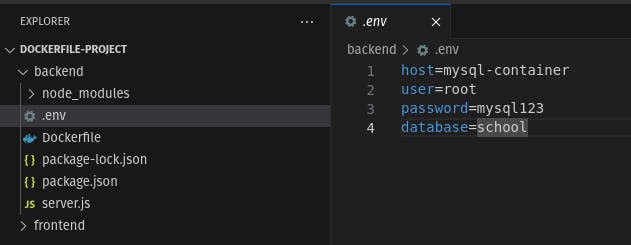
Open the backend folder and check the .env file.
In the .env file, I have added the MySQL container name as the host to make a connection between the backend and the database. You can change the host name but make sure to keep the name the same as the MySQL container name and the same things for other variables.
Now, let’s deploy our application on containers.
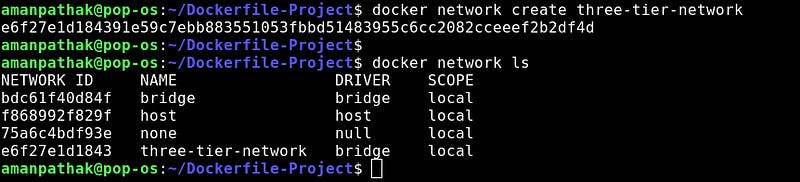
First of all, we need our network in which all three containers will be running and it is necessary because all three containers need to access each other.
Create a network
docker network create three-tier-network
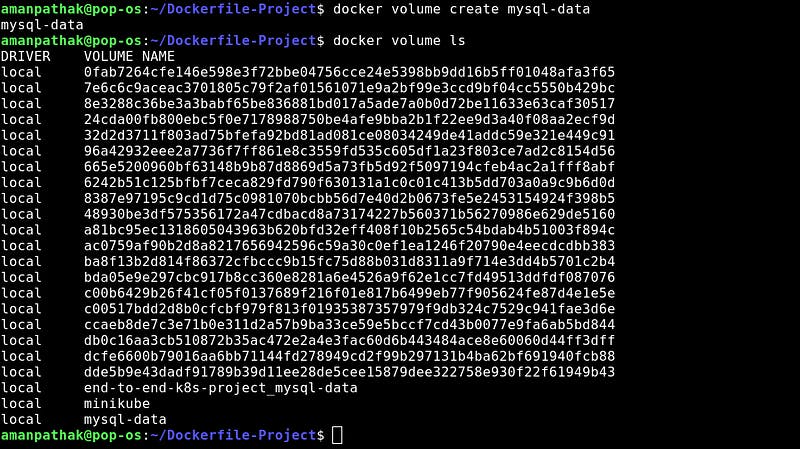
Now, Our data is a crucial thing that needs to stay for a long. But if the container is stopped or fails then we will lose our all application data.
Create a volume
docker volume create mysql-data
As our major pre-requisites are completed. Let’s create a Dockerfile for each application which includes frontend(reactjs), backend(nodejs), and database(mysql).
Let’s start with the MySQL database.
This is our database Dockerfile.
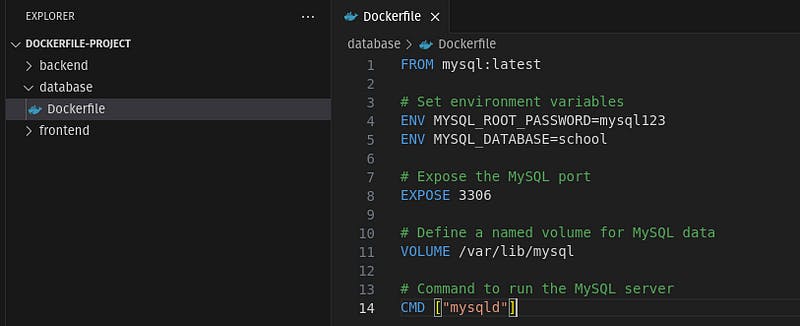
Explanation of database Dockerfile:
FROM mysql:latest
This command will download the MySQL image from dockerhub.
ENV MYSQL_ROOT_PASSWORD\=mysql123
ENV MYSQL_DATABASE\=school
This will set the environment variable for our database configurations.
EXPOSE 3306
This will expose the port. So that, the backend will be able to reach out to the database.
VOLUME /var/lib/mysql
To get rid of data lost, we will use volume. Hence, we have added volume to our mysql container.
CMD [“mysqld”]
This will start the mysql service
Now, let’s build the MySQL image & run the container
docker build -t mysql-image .

Run the mysql container
docker run — name mysql-container — network=three-tier-network -p 3306:3306 -v mysql-data:/var/lib/mysql -d mysql-image
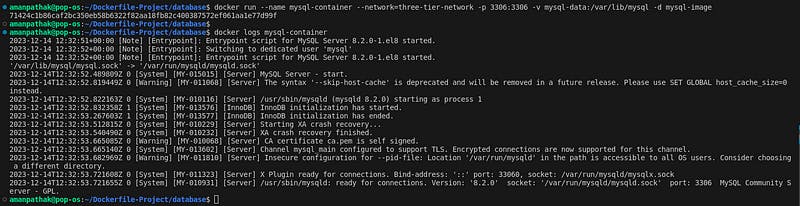
Now, get into the MySQL docker container by running the below command.
docker exec -it /bin/bash
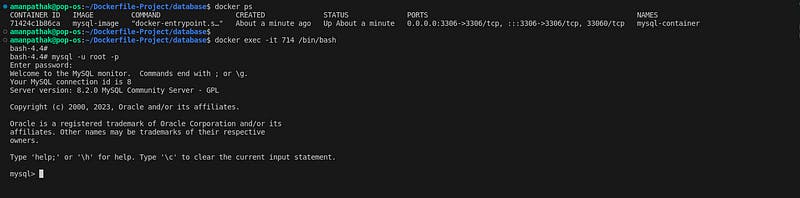
Now, we need to create two tables to store our data in the particular table. Use the below command.
USE school;
CREATE TABLE student (id INT AUTO_INCREMENT PRIMARY KEY, name varchar(40), roll_number int, class varchar(16));
CREATE TABLE teacher (id INT AUTO_INCREMENT PRIMARY KEY, name varchar(40), subject varchar(40), class varchar(16));

The database is set and ready to connect with the backend.
Let’s deploy our backend application on the docker container.
This is our backend Dockerfile.
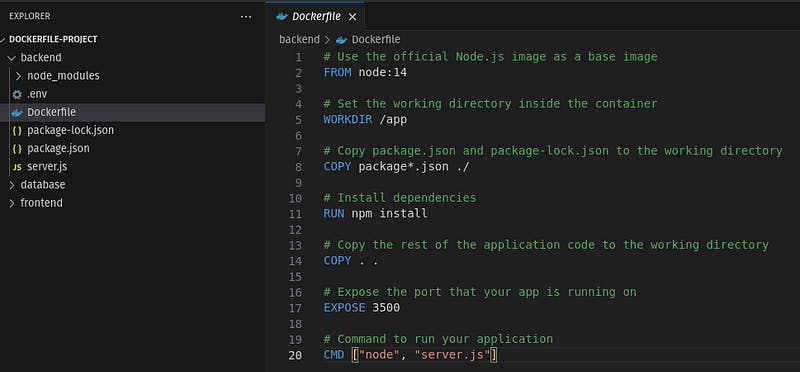
Explanation of backend Dockerfile:
FROM node:14
This command will download the node image from dockerhub.
WORKDIR /app
It will set up our work directory which will be an /app.
COPY package*.json ./
This command will copy both the package files to resolve the dependencies issues.
RUN npm install
This command will install the dependencies that we have in the package files.
COPY . .
This command will copy all the files that are present in the current directory to the /app directory.
EXPOSE 3500
This command will expose the port to allow the frontend container to make communication.
CMD [“node”, “server.js”]
This command will run our backend application.
Now, let’s build the backend image & run the backend container
docker build -t backend .
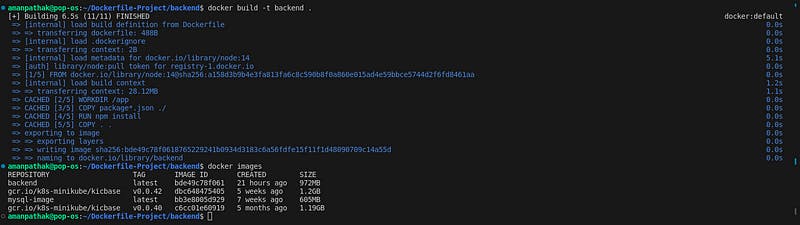
docker run -d -p 3500:3500 — name backend-container — network=three-tier-network backend

To validate, whether your backend application is running fine or not. Hit the localhost:3500 on your favorite browser.
As you can see, the backend application is responding as we expected.

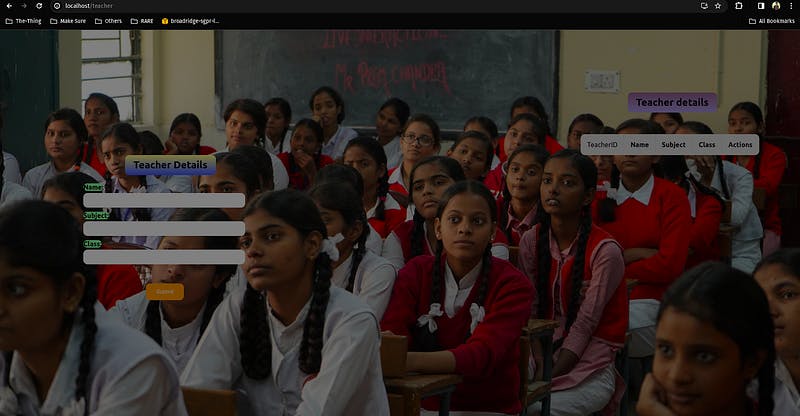
Let’s deploy our frontend application on the docker container.
This is our frontend Dockerfile.
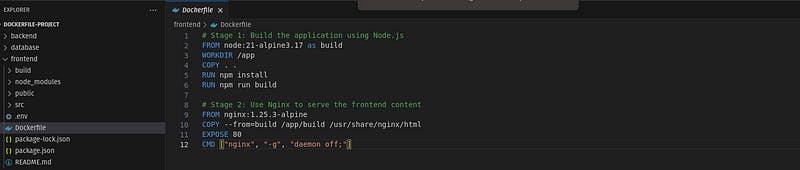
In the frontend Dockerfile, we are implementing multi staging, because our application is reactjs based and we need to host it on our Nginx web server.
Explanation of frontend Dockerfile:
FROM node:21-alpine3.17 as build
This command will download the node image on the local machine and the entire execution will be built to use it in the next stage.
WORKDIR /app
It will set up our work directory which will be an /app.
COPY . .
This command will copy all the files that are present in the current directory to the /app directory.
RUN npm install
This command will install the dependencies that we have in the package files.
RUN npm run build
This command will create the build directory in which our content is present to host on the nginx server.
Here, our first stage is completed. Now, we have to shift our content to the /usr/share/nginx/html folder.
FROM nginx:1.25.3-alpine
This command will download the nginx image.
COPY — from=build /app/build /usr/share/nginx/html
This command will copy all the files that are present inside the build directory to /usr/share/nginx/html.
EXPOSE 80
This command will expose the port. So, we will be able to access the front end.
CMD [“nginx”, “-g”, “daemon off;”]
This command will run the nginx web server in the foreground and make sure to keep running in the foreground.
Now, let’s build the frontend image & run the container
docker build -t frontend .
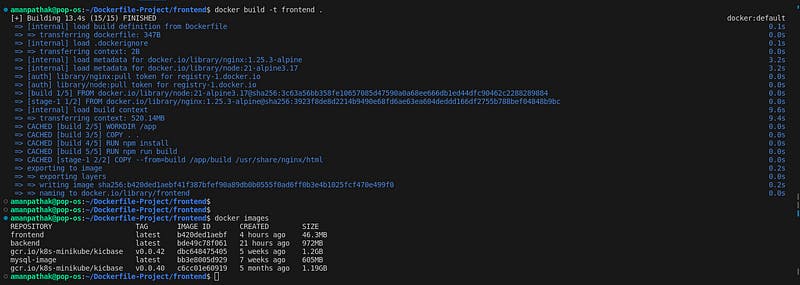
docker run -d — name frontend-container — network=three-tier-network -p 80:80 frontend
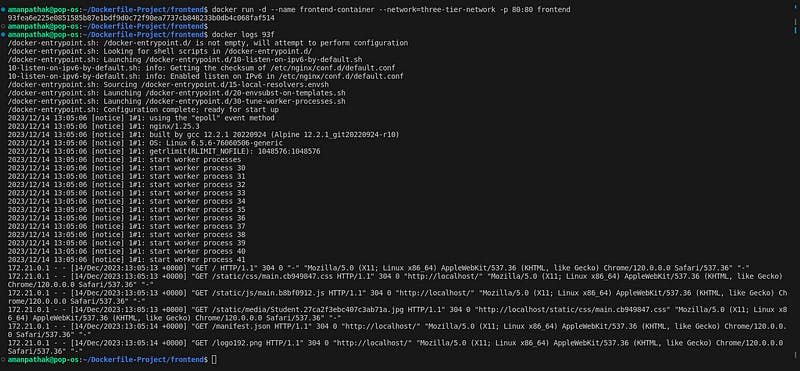
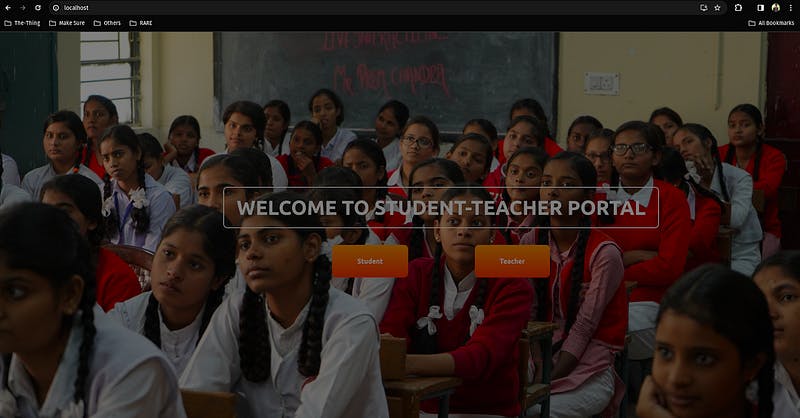
If you hit the localhost:80 or just localhost on your favorite browser. You will see the magic.
Click on Student.
Enter the data and click on Submit.
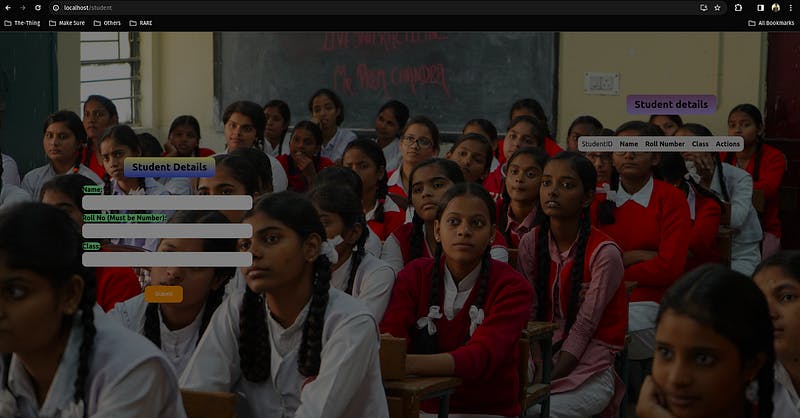
You will see the data is inserted and you will be able to view it. If you want to delete the data, kindly click on the delete button.

We have provided the volume to the database container. So, if the container is deleted, then don’t worry the data will be still available and it will be automatically added to the new docker container, you just need to provide the same docker volume.
Deploy using Docker-Compose file
This is it for multiple Dockerfiles.
However, the process is a little bit lengthy by creating each image and creating each container.
To get rid of this issue, I will use docker-compose here which will help me to create the docker image and create the container of that image in one go.
Let’s do that.
Before going to do the demo for docker-compose, make sure that all three docker images and containers are deleted.

In docker-compose, you don’t need to create a network or volume manually. docker-compose will take care of those things.
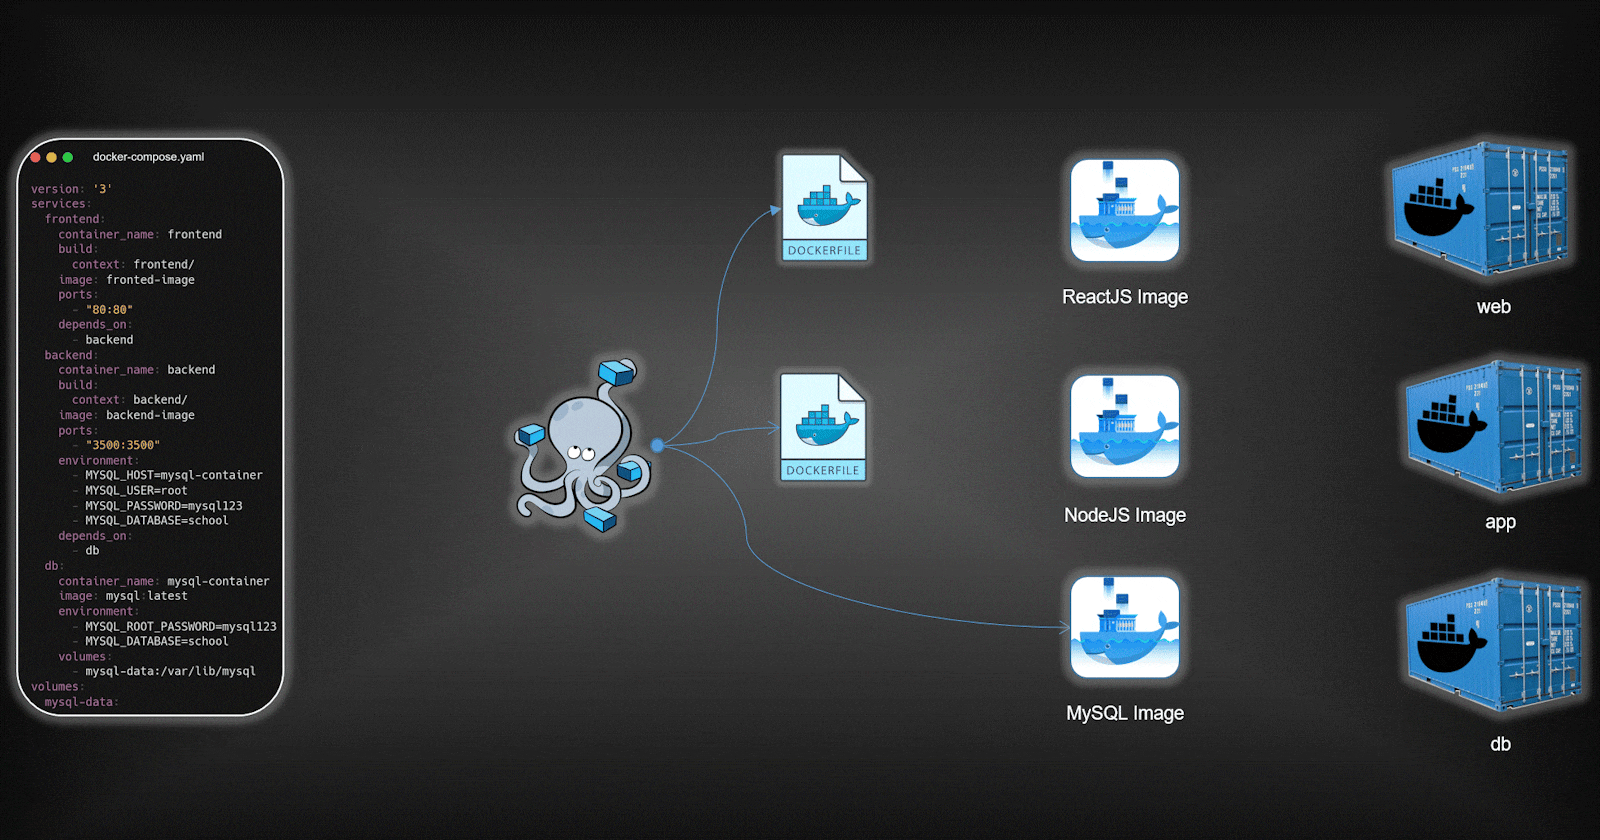
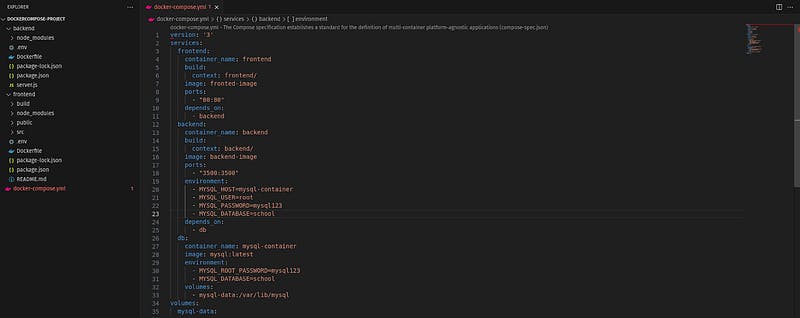
The Dockerfile for frontend and backend will remain the same. You can see the file structure and docker-compose.yml file in below screenshot and keep it as it is.
Note: Ignore the error showing in the docker-compose file because docker is not installed in the VS code.
docker-compose file explanation:
This specifies the docker-compose file format.
version: ‘3’
In the below code, we are creating a frontend container where the Dockerfile will be taken from the frontend directory. The frontend container will be running on port 80 and the container will depend on the backend container which means the backend container will be created first then, only the frontend container will be created.
services:
frontend:
container_name: frontend
build:
context: frontend/
image: fronted-image
ports:
- "80:80"
depends_on:
- backend
In the below code, we are creating a backend container where the Dockerfile will be taken from the backend directory. The backend container will be running on port 3500 and the container will depend on the database container which means the database container will be created first then, only the backend container will be created. Also, there are some environment variables are added to use for the backend code.
backend:
container_name: backend
build:
context: backend/
image: backend-image
ports:
- "3500:3500"
environment:
- MYSQL_HOST=mysql-container
- MYSQL_USER=root
- MYSQL_PASSWORD=mysql123
- MYSQL_DATABASE=school
depends_on:
- db
In the below code, we are creating a database container where the Dockerfile is not necessary. The database container will be running on port 3306. Also, there are some environment variables are added to use for the MySQL database configurations and we have added the volume to the mysql container to get rid of data loss.
db:
container_name: mysql-container
image: mysql:latest
environment:
- MYSQL_ROOT_PASSWORD=mysql123
- MYSQL_DATABASE=school
volumes:
- mysql-data:/var/lib/mysql
volumes:
mysql-data:
Let’s try to deploy our application using docker-compose
There is one pre-requisite for docker-compose docker-compose must be installed on your machine. If not, then use the below command to install it.
apt install docker-compose -y
After installing the docker-compose, run the docker-compose file to deploy your application.
docker-compose up -d

Now, hit the localhost on your favorite browser and enjoy the application.
Conclusion
In the dynamic landscape of container orchestration, deploying a three-tier MERN stack application unveils a captivating journey. Whether opting for Dockerfile’s granular control or Docker-Compose’s cohesive approach, this blog equips you with the knowledge to navigate the intricate deployment process. Embrace containerization, fortify your applications, and set sail into the seamless world of Docker deployment.
Feel free to reach out to me if you have any doubts or queries.
Profile-LinkedIn- https://www.linkedin.com/in/aman-devops/
GitHub- https://github.com/AmanPathak-DevOps/
Profile- https://linktr.ee/Aman_Pathak
Happy Learning!
Aman Pathak
Stackademic
Thank you for reading until the end. Before you go:
- Please consider clapping and following the writer! 👏
- Follow us on Twitter(X), LinkedIn, and YouTube.
- Visit Stackademic.com to find out more about how we are democratizing free programming education around the world.